 After several posts on rhinestones and jewels, you're probably wondering what I'm going to do with them.
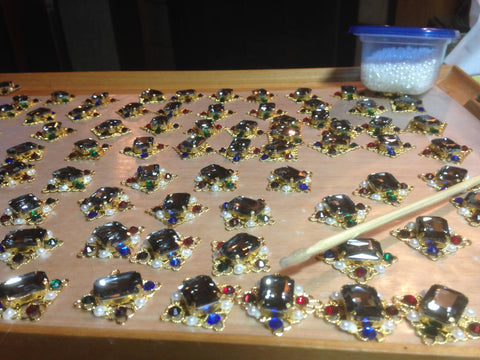
I'm making ouches. Ouches were small(ish) jewelry pieces, similar to decorative buttons or brooches. In the period, the most wealthy people wore jewelry everywhere they could find to put it, and much of this jewelry was in the form of ouches.
Ouches were made of precious metals and gems and were extremely expensive. They seem to have usually been used in matching sets, although often you'll see several different sets worn at once. Many of Queen Elizabeth's portraits show her wearing sets of red stones and of black stones at the same time.
There are some craftsmen making excellent reproduction ouches, but but given that I need over 200(!) of them, I need a less expensive alternative, so I'm turning to a technique I've been using for many years. I'm well aware that these are not historically accurate and would not be suitable for strict reenactment, but there are plenty of venues for wearing Elizabethan styles in which they are appropriate.
When I first started making Elizabethan court gowns, I wanted to find a way to create ouches, so I went looking through the few costuming books to which I had access. (yes, this was many years before the internet. I'm old.) In her book “Period Costume For Stage and Screen”, I read that when Jean Hunnisett, who made the costumes for the classic series Elizabeth R, needed ouches for Queen Elizabeth's Ditchley Dress, she used “...jewels made up of six pearls and a colored stone glued onto a gold plastic mount”
While these are quite pretty, I wasn't thrilled with the idea of plastic mounts, and I couldn't find them anyway, so I started experimenting with using filigree jewelry findings as the base for my ouches. These are stamped from thin metal, usually brass, and are available in a number of finishes.
I make the ouches by gluing on rhinestones, glass jewels, and pearls. Some people disdain using glue for any reason, but I don't have metalworking skills or the time to acquire them. If the proper glues and appropriate stones are used, these ouches can be quite sturdy and will last for years.
Supplies for Making Ouches
For filigrees, I don't recommend the raw brass ones because the metal can oxidize and discolor, staining your fabric. The gold or silver plated ones are only a few cents more.
Your stones can be faceted, or cabochons (domed). I strongly recommend glass or crystal stones, not the plastic ones which look like what they are. It's difficult to find stones in the flat table or pyramid cuts that were used in the 16th century, so I compromise by using modern faceted rhinestones. For my large stones, I used rectangular/octangular glass gems, which have a large flat area on top.
Round pearls can be a problem because it's hard to glue them on well. Even if you wire or sew them in place, they tend to catch on things and are much more likely to break or pop off. Flat back pearls are easier to work with and are much more secure. I bought the ones I'm using here in a box of mixed sizes at Michaels.
The right glue is vital. If you're gluing metal to metal, as I did for the large jewels in metal settings, the usual recommendation is for cyanoacrylate "super glue", 2 part epoxy, or E6000. My preference is for E6000 because you can move it around a bit for a while. It is toxic, so use it in a ventilated space.
I don't use E6000 for the smaller gems because it's hard to control. It tends to come out in big gobs and picking up smaller amounts with a toothpick doesn't work well. For gluing the smaller gems and the flat back pearls I used Gem-Tac, which is similar to white glue and is intended for gluing gems to a variety of materials. Metal is not one of the materials listed on the bottle, but it works fine for me.
Because the filigree has holes in it, glue will leak through to the work surface. To keep my surface clean and keep the piece from gluing itself in place, I always work on a sheet of waxed paper. It can easily be peeled off the piece even after the glue has dried.
Apply the glue to the filigree, and let it dry for a minute before placing your gems. It will make it much easier to place them.
Something that makes gluing small objects much easier is a bead picker-upper. This is simply a stick with a bit of sticky wax on the end. I use dental wax and bamboo skewers to make mine. Just grab a pea sized lump of wax, roll it into a ball, and stick it on the end of the skewer, shaping it into a blunt point. 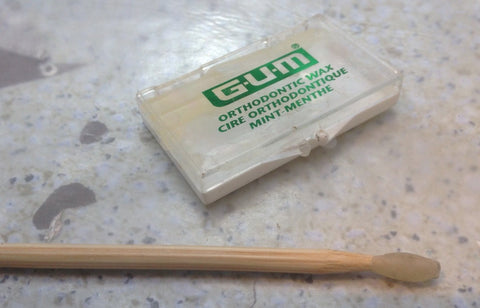
Simply touch the jewel with just enough force to make it stick, and place the jewel on the glued surface.
In Part 2, I'll talk about designing your ouches and how to attach them to your garments.
https://www.acerthailnd.com/
https://www.acerthailnd.com/huaythai
https://www.acerthailnd.com/contact
https://github.com/turingaicloud/quickstart/issues/10
https://github.com/kvspb/nginx-auth-ldap/issues/259
https://github.com/Kr1s77/FgSurfing/issues/2
https://github.com/stawel/ht301_hacklib/issues/17
https://sistacafe.com/summaries/preview/219483
https://sistacafe.com/summaries/preview/219515
https://sistacafe.com/summaries/preview/219516
https://sistacafe.com/summaries/preview/219517
https://sistacafe.com/summaries/preview/219522
https://sistacafe.com/summaries/preview/219527
https://sistacafe.com/summaries/preview/219528
https://sistacafe.com/summaries/preview/219529
https://sistacafe.com/summaries/preview/219530
https://sistacafe.com/summaries/preview/219531
https://sistacafe.com/summaries/preview/219532
https://sistacafe.com/summaries/preview/219534
https://sistacafe.com/summaries/preview/219537
https://sistacafe.com/summaries/preview/219539
https://sistacafe.com/summaries/preview/219540
https://sistacafe.com/summaries/preview/219544
https://sistacafe.com/summaries/preview/219545
https://sistacafe.com/summaries/preview/219546
https://sistacafe.com/summaries/preview/219547
https://sistacafe.com/summaries/preview/219548
https://sistacafe.com/summaries/preview/219549
https://sistacafe.com/summaries/preview/219550
https://sistacafe.com/summaries/preview/219551
https://sistacafe.com/summaries/preview/219560
https://sistacafe.com/summaries/preview/219561
https://sistacafe.com/summaries/preview/219562
https://sistacafe.com/summaries/preview/219574
https://sistacafe.com/summaries/preview/219580
https://sistacafe.com/summaries/preview/219583
https://sistacafe.com/summaries/preview/219585
https://sistacafe.com/summaries/preview/219486
https://sistacafe.com/summaries/preview/219484
https://sistacafe.com/summaries/preview/219490
https://sistacafe.com/summaries/preview/219496
https://sistacafe.com/summaries/preview/219491
https://sistacafe.com/summaries/preview/219492
https://sistacafe.com/summaries/preview/219495
https://sistacafe.com/summaries/preview/219494
https://sistacafe.com/summaries/preview/219497
https://sistacafe.com/summaries/preview/219498
https://sistacafe.com/summaries/preview/219499
https://sistacafe.com/summaries/preview/219493
https://sistacafe.com/summaries/preview/219500
https://sistacafe.com/summaries/preview/219501
https://sistacafe.com/summaries/preview/219502
https://sistacafe.com/summaries/preview/219503
https://sistacafe.com/summaries/preview/219504
https://sistacafe.com/summaries/preview/219505
https://sistacafe.com/summaries/preview/219506
https://sistacafe.com/summaries/preview/219507
https://sistacafe.com/summaries/preview/219519
https://sistacafe.com/summaries/preview/219518
https://sistacafe.com/summaries/preview/219520
https://sistacafe.com/summaries/preview/219523
https://sistacafe.com/summaries/preview/219526
https://sistacafe.com/summaries/preview/219524
https://sistacafe.com/summaries/preview/219525
https://sistacafe.com/summaries/preview/219521
https://sistacafe.com/summaries/preview/219536
https://sistacafe.com/summaries/preview/219555
https://sistacafe.com/summaries/preview/219576
https://sistacafe.com/summaries/preview/219579
https://sistacafe.com/summaries/preview/219556
https://sistacafe.com/summaries/preview/219558
https://sistacafe.com/summaries/preview/219557
https://sistacafe.com/summaries/preview/219559
https://sistacafe.com/summaries/preview/219564
https://sistacafe.com/summaries/preview/219565
https://sistacafe.com/summaries/preview/219566
https://sistacafe.com/summaries/preview/219570
https://sistacafe.com/summaries/preview/219568
https://sistacafe.com/summaries/preview/219575
https://sistacafe.com/summaries/preview/219577
https://sistacafe.com/summaries/preview/219582
https://sistacafe.com/summaries/preview/219581
https://sistacafe.com/summaries/preview/219567
https://sistacafe.com/summaries/preview/219578
https://sistacafe.com/summaries/preview/219571
https://sistacafe.com/summaries/preview/219569
https://sistacafe.com/summaries/preview/219589
https://sistacafe.com/summaries/preview/219593
https://sistacafe.com/summaries/preview/219595
https://sistacafe.com/summaries/preview/219619
https://sistacafe.com/summaries/preview/219620
https://sistacafe.com/summaries/preview/219621
https://sistacafe.com/summaries/preview/219622
https://sistacafe.com/summaries/preview/219623
https://sistacafe.com/summaries/preview/219624
https://sistacafe.com/summaries/preview/219625
https://sistacafe.com/summaries/preview/219626
https://sistacafe.com/summaries/preview/219627
https://sistacafe.com/summaries/preview/219628
https://sistacafe.com/summaries/preview/219629
https://sistacafe.com/summaries/preview/219630
https://sistacafe.com/summaries/preview/219631
https://sistacafe.com/summaries/preview/219632
https://sistacafe.com/summaries/preview/219633
https://sistacafe.com/summaries/preview/219634
https://sistacafe.com/summaries/preview/219635
https://sistacafe.com/summaries/preview/219637
https://sistacafe.com/summaries/preview/219638
https://sistacafe.com/summaries/preview/219639
https://sistacafe.com/summaries/preview/219640
https://sistacafe.com/summaries/preview/219641
https://sistacafe.com/summaries/preview/219642
https://sistacafe.com/summaries/preview/219645
https://sistacafe.com/summaries/preview/219659
https://sistacafe.com/summaries/preview/219660
https://sistacafe.com/summaries/preview/219666
https://sistacafe.com/summaries/preview/219667
https://sistacafe.com/summaries/preview/219668
https://sistacafe.com/summaries/preview/219669
https://sistacafe.com/summaries/preview/219670
https://sistacafe.com/summaries/preview/219604
https://sistacafe.com/summaries/preview/219605
https://sistacafe.com/summaries/preview/219606
https://sistacafe.com/summaries/preview/219610
https://sistacafe.com/summaries/preview/219608
https://sistacafe.com/summaries/preview/219607
https://sistacafe.com/summaries/preview/219612
https://sistacafe.com/summaries/preview/219609
https://sistacafe.com/summaries/preview/219611
https://sistacafe.com/summaries/preview/219613
https://sistacafe.com/summaries/preview/219614
https://sistacafe.com/summaries/preview/219618
https://sistacafe.com/summaries/preview/219616
https://sistacafe.com/summaries/preview/219617
https://sistacafe.com/summaries/preview/219615
https://sistacafe.com/summaries/preview/219654
https://sistacafe.com/summaries/preview/219651
https://sistacafe.com/summaries/preview/219653
https://sistacafe.com/summaries/preview/219650
https://sistacafe.com/summaries/preview/219657
https://sistacafe.com/summaries/preview/219658
https://sistacafe.com/summaries/preview/219652
https://sistacafe.com/summaries/preview/219655
https://sistacafe.com/summaries/preview/219663
https://sistacafe.com/summaries/preview/219665
https://sistacafe.com/summaries/preview/219662
https://sistacafe.com/summaries/preview/219661
https://sistacafe.com/summaries/preview/219649
https://sistacafe.com/summaries/preview/219664
https://sistacafe.com/summaries/preview/219656
https://sistacafe.com/summaries/preview/219646
https://sistacafe.com/summaries/preview/219644
https://sistacafe.com/summaries/preview/219647
https://sistacafe.com/summaries/preview/219671
https://sistacafe.com/summaries/preview/219672
https://sistacafe.com/summaries/preview/219673
https://sistacafe.com/summaries/preview/219674
https://sistacafe.com/summaries/preview/219675
https://sistacafe.com/summaries/preview/219676
https://sistacafe.com/summaries/preview/219677
https://sistacafe.com/summaries/preview/219678
https://sistacafe.com/summaries/preview/219679
https://sistacafe.com/summaries/preview/219680
https://sistacafe.com/summaries/preview/219681
https://sistacafe.com/summaries/preview/219682
https://sistacafe.com/summaries/preview/219683
https://sistacafe.com/summaries/preview/219684
https://sistacafe.com/summaries/preview/219685
https://sistacafe.com/summaries/preview/219686
https://sistacafe.com/summaries/preview/219687
https://sistacafe.com/summaries/preview/219688
https://sistacafe.com/summaries/preview/219689
https://sistacafe.com/summaries/preview/219690
https://sistacafe.com/summaries/preview/219691
https://sistacafe.com/summaries/preview/219692
https://sistacafe.com/summaries/preview/219693
https://sistacafe.com/summaries/preview/219694
https://sistacafe.com/summaries/preview/219695
https://sistacafe.com/summaries/preview/219696
https://sistacafe.com/summaries/preview/219697
https://sistacafe.com/summaries/preview/219698
https://sistacafe.com/summaries/preview/219699
https://sistacafe.com/summaries/preview/219700
https://sistacafe.com/summaries/preview/219701
https://sistacafe.com/summaries/preview/219702
https://sistacafe.com/summaries/preview/219709
https://sistacafe.com/summaries/preview/219710
https://sistacafe.com/summaries/preview/219711
https://sistacafe.com/summaries/preview/219712
https://sistacafe.com/summaries/preview/219713
https://sistacafe.com/summaries/preview/219714
https://sistacafe.com/summaries/preview/219715
https://sistacafe.com/summaries/preview/219716
https://sistacafe.com/summaries/preview/219717
https://sistacafe.com/summaries/preview/219718
https://sistacafe.com/summaries/preview/219719
https://sistacafe.com/summaries/preview/219720
https://sistacafe.com/summaries/preview/219721
https://sistacafe.com/summaries/preview/219722
https://sistacafe.com/summaries/preview/219723
https://sistacafe.com/summaries/preview/219724
https://sistacafe.com/summaries/preview/219725
https://sistacafe.com/summaries/preview/219726
https://sistacafe.com/summaries/preview/219727
https://sistacafe.com/summaries/preview/219729
https://sistacafe.com/summaries/preview/219730
https://sistacafe.com/summaries/preview/219731
https://sistacafe.com/summaries/preview/219740
https://sistacafe.com/summaries/preview/219741
https://sistacafe.com/summaries/preview/219742
https://sistacafe.com/summaries/preview/219743
https://sistacafe.com/summaries/preview/219750
https://sistacafe.com/summaries/preview/219751
https://sistacafe.com/summaries/preview/219752
https://sistacafe.com/summaries/preview/219753
https://sistacafe.com/summaries/preview/219703
https://sistacafe.com/summaries/preview/219705
https://sistacafe.com/summaries/preview/219707
https://sistacafe.com/summaries/preview/219708
https://sistacafe.com/summaries/preview/219706
https://sistacafe.com/summaries/preview/219732
https://sistacafe.com/summaries/preview/219704
https://sistacafe.com/summaries/preview/219733
https://sistacafe.com/summaries/preview/219734
https://sistacafe.com/summaries/preview/219735
https://sistacafe.com/summaries/preview/219737
https://sistacafe.com/summaries/preview/219739
https://sistacafe.com/summaries/preview/219738
https://sistacafe.com/summaries/preview/219736
https://sistacafe.com/summaries/preview/219744
https://sistacafe.com/summaries/preview/219745
https://sistacafe.com/summaries/preview/219748
https://sistacafe.com/summaries/preview/219746
https://sistacafe.com/summaries/preview/219749
https://sistacafe.com/summaries/preview/219747
https://sistacafe.com/summaries/preview/219761
https://sistacafe.com/summaries/preview/219763
https://sistacafe.com/summaries/preview/219762
https://sistacafe.com/summaries/preview/219760
https://sistacafe.com/summaries/preview/219756
https://sistacafe.com/summaries/preview/219755
https://sistacafe.com/summaries/preview/219754
https://sistacafe.com/summaries/preview/219758
https://sistacafe.com/summaries/preview/219757
https://sistacafe.com/summaries/preview/219759
https://sistacafe.com/summaries/preview/219765
https://sistacafe.com/summaries/preview/219766
https://sistacafe.com/summaries/preview/219767
https://sistacafe.com/summaries/preview/219768
https://sistacafe.com/summaries/preview/219769
https://sistacafe.com/summaries/preview/219770
https://sistacafe.com/summaries/preview/219771
https://sistacafe.com/summaries/preview/219772
https://sistacafe.com/summaries/preview/219773
https://sistacafe.com/summaries/preview/219774
https://sistacafe.com/summaries/preview/219775
https://sistacafe.com/summaries/preview/219776
https://sistacafe.com/summaries/preview/219777
https://sistacafe.com/summaries/preview/219778
https://sistacafe.com/summaries/preview/219779
https://sistacafe.com/summaries/preview/219780
https://sistacafe.com/summaries/preview/219781
https://sistacafe.com/summaries/preview/219782
https://sistacafe.com/summaries/preview/219783
https://sistacafe.com/summaries/preview/219784
https://sistacafe.com/summaries/preview/219785
https://sistacafe.com/summaries/preview/219786
https://sistacafe.com/summaries/preview/219787
https://sistacafe.com/summaries/preview/219788
https://sistacafe.com/summaries/preview/219789
https://sistacafe.com/summaries/preview/219790
https://sistacafe.com/summaries/preview/219791
https://sistacafe.com/summaries/preview/219792
https://sistacafe.com/summaries/preview/219793
https://sistacafe.com/summaries/preview/219794
https://sistacafe.com/summaries/preview/219795
https://sistacafe.com/summaries/preview/219796
https://sistacafe.com/summaries/preview/219797
https://sistacafe.com/summaries/preview/219806
https://sistacafe.com/summaries/preview/219807
https://sistacafe.com/summaries/preview/219808
https://sistacafe.com/summaries/preview/219809
https://sistacafe.com/summaries/preview/219810
https://sistacafe.com/summaries/preview/219811
https://sistacafe.com/summaries/preview/219812
https://sistacafe.com/summaries/preview/219813
https://sistacafe.com/summaries/preview/219814
https://sistacafe.com/summaries/preview/219815
https://sistacafe.com/summaries/preview/219816
https://sistacafe.com/summaries/preview/219817
https://sistacafe.com/summaries/preview/219818
https://sistacafe.com/summaries/preview/219819
https://sistacafe.com/summaries/preview/219820
https://sistacafe.com/summaries/preview/219822
https://sistacafe.com/summaries/preview/219823
https://sistacafe.com/summaries/preview/219824
https://sistacafe.com/summaries/preview/219825
https://sistacafe.com/summaries/preview/219826
https://sistacafe.com/summaries/preview/219878
https://sistacafe.com/summaries/preview/219880
https://sistacafe.com/summaries/preview/219881
https://sistacafe.com/summaries/preview/219885
https://sistacafe.com/summaries/preview/219886
https://sistacafe.com/summaries/preview/219890
https://sistacafe.com/summaries/preview/219891
https://sistacafe.com/summaries/preview/219892
https://sistacafe.com/summaries/preview/219893
https://sistacafe.com/summaries/preview/219894
https://sistacafe.com/summaries/preview/219803
https://sistacafe.com/summaries/preview/219800
https://sistacafe.com/summaries/preview/219801
https://sistacafe.com/summaries/preview/219802
https://sistacafe.com/summaries/preview/219828
https://sistacafe.com/summaries/preview/219827
https://sistacafe.com/summaries/preview/219805
https://sistacafe.com/summaries/preview/219834
https://sistacafe.com/summaries/preview/219833
https://sistacafe.com/summaries/preview/219829
https://sistacafe.com/summaries/preview/219804
https://sistacafe.com/summaries/preview/219831
https://sistacafe.com/summaries/preview/219839
https://sistacafe.com/summaries/preview/219842
https://sistacafe.com/summaries/preview/219836
https://sistacafe.com/summaries/preview/219832
https://sistacafe.com/summaries/preview/219837
https://sistacafe.com/summaries/preview/219838
https://sistacafe.com/summaries/preview/219841
https://sistacafe.com/summaries/preview/219835
https://sistacafe.com/summaries/preview/219843
https://sistacafe.com/summaries/preview/219845
https://sistacafe.com/summaries/preview/219844
https://sistacafe.com/summaries/preview/219847
https://sistacafe.com/summaries/preview/219846
https://sistacafe.com/summaries/preview/219848
https://sistacafe.com/summaries/preview/219830
https://sistacafe.com/summaries/preview/219849
https://sistacafe.com/summaries/preview/219850
https://sistacafe.com/summaries/preview/219851
https://sistacafe.com/summaries/preview/219852
https://sistacafe.com/summaries/preview/219853
https://sistacafe.com/summaries/preview/219854
https://sistacafe.com/summaries/preview/219855
https://sistacafe.com/summaries/preview/219856
https://sistacafe.com/summaries/preview/219857
https://sistacafe.com/summaries/preview/219858
https://sistacafe.com/summaries/preview/219859
https://sistacafe.com/summaries/preview/219860
https://sistacafe.com/summaries/preview/219861
https://sistacafe.com/summaries/preview/219862
https://sistacafe.com/summaries/preview/219863
https://sistacafe.com/summaries/preview/219864
https://sistacafe.com/summaries/preview/219865
https://sistacafe.com/summaries/preview/219866
https://sistacafe.com/summaries/preview/219867
https://sistacafe.com/summaries/preview/219868
https://sistacafe.com/summaries/preview/219869
https://sistacafe.com/summaries/preview/219870
https://sistacafe.com/summaries/preview/219871
https://sistacafe.com/summaries/preview/219872
https://sistacafe.com/summaries/preview/219873
https://sistacafe.com/summaries/preview/219874
https://sistacafe.com/summaries/preview/219875
https://sistacafe.com/summaries/preview/219876
https://sistacafe.com/summaries/preview/219877
https://sistacafe.com/summaries/preview/219879
https://sistacafe.com/summaries/preview/219882
https://sistacafe.com/summaries/preview/219883
https://sistacafe.com/summaries/preview/219884
https://sistacafe.com/summaries/preview/219887
https://sistacafe.com/summaries/preview/219888
https://sistacafe.com/summaries/preview/219889
https://sistacafe.com/summaries/preview/219896
https://sistacafe.com/summaries/preview/219897
https://sistacafe.com/summaries/preview/219898
https://sistacafe.com/summaries/preview/219899
https://sistacafe.com/summaries/preview/219900
https://sistacafe.com/summaries/preview/219901
https://sistacafe.com/summaries/preview/219902
https://sistacafe.com/summaries/preview/219903
https://sistacafe.com/summaries/preview/219904
https://sistacafe.com/summaries/preview/219905
https://sistacafe.com/summaries/preview/219906
https://sistacafe.com/summaries/preview/219907
https://sistacafe.com/summaries/preview/219908
https://sistacafe.com/summaries/preview/219909
https://sistacafe.com/summaries/preview/219910
https://sistacafe.com/summaries/preview/219911
https://sistacafe.com/summaries/preview/219912
https://sistacafe.com/summaries/preview/219913
https://sistacafe.com/summaries/preview/219914
https://sistacafe.com/summaries/preview/219915
https://sistacafe.com/summaries/preview/219916
https://sistacafe.com/summaries/preview/219917
https://sistacafe.com/summaries/preview/219918
https://sistacafe.com/summaries/preview/219919
https://sistacafe.com/summaries/preview/219920
https://sistacafe.com/summaries/preview/219921
https://sistacafe.com/summaries/preview/219922
https://sistacafe.com/summaries/preview/219923
https://sistacafe.com/summaries/preview/219924
https://sistacafe.com/summaries/preview/219925
https://sistacafe.com/summaries/preview/219926
https://sistacafe.com/summaries/preview/219927
https://sistacafe.com/summaries/preview/219934
https://sistacafe.com/summaries/preview/219928
https://sistacafe.com/summaries/preview/219930
https://sistacafe.com/summaries/preview/219932
https://sistacafe.com/summaries/preview/219929
https://sistacafe.com/summaries/preview/219941
https://sistacafe.com/summaries/preview/219938
https://sistacafe.com/summaries/preview/219940
https://sistacafe.com/summaries/preview/219950
https://sistacafe.com/summaries/preview/219945
https://sistacafe.com/summaries/preview/219942
https://sistacafe.com/summaries/preview/219937
https://sistacafe.com/summaries/preview/219935
https://sistacafe.com/summaries/preview/219931
https://sistacafe.com/summaries/preview/219936
https://sistacafe.com/summaries/preview/219933
https://sistacafe.com/summaries/preview/219948
https://sistacafe.com/summaries/preview/219947
https://sistacafe.com/summaries/preview/219949
https://sistacafe.com/summaries/preview/219939
https://sistacafe.com/summaries/preview/219944
https://sistacafe.com/summaries/preview/219946
https://sistacafe.com/summaries/preview/219943
https://sistacafe.com/summaries/preview/219955
https://sistacafe.com/summaries/preview/219954
https://sistacafe.com/summaries/preview/219953
https://sistacafe.com/summaries/preview/219952
https://sistacafe.com/summaries/preview/219993
https://sistacafe.com/summaries/preview/219958
https://sistacafe.com/summaries/preview/219960
https://sistacafe.com/summaries/preview/219961
https://sistacafe.com/summaries/preview/219962
https://sistacafe.com/summaries/preview/219963
https://sistacafe.com/summaries/preview/219965
https://sistacafe.com/summaries/preview/219968
https://sistacafe.com/summaries/preview/219969
https://sistacafe.com/summaries/preview/219970
https://sistacafe.com/summaries/preview/219971
https://sistacafe.com/summaries/preview/219972
https://sistacafe.com/summaries/preview/219973
https://sistacafe.com/summaries/preview/219974
https://sistacafe.com/summaries/preview/219975
https://sistacafe.com/summaries/preview/219976
https://sistacafe.com/summaries/preview/219977
https://sistacafe.com/summaries/preview/219978
https://sistacafe.com/summaries/preview/219979
https://sistacafe.com/summaries/preview/219980
https://sistacafe.com/summaries/preview/219981
https://sistacafe.com/summaries/preview/219982
https://sistacafe.com/summaries/preview/219983
https://sistacafe.com/summaries/preview/219985
https://sistacafe.com/summaries/preview/219986
https://sistacafe.com/summaries/preview/219987
https://sistacafe.com/summaries/preview/219988
https://sistacafe.com/summaries/preview/219989
https://sistacafe.com/summaries/preview/219990
https://sistacafe.com/summaries/preview/219991
https://sistacafe.com/summaries/preview/219992
https://sistacafe.com/summaries/preview/220000
https://sistacafe.com/summaries/preview/220001
https://sistacafe.com/summaries/preview/220002
https://sistacafe.com/summaries/preview/220003
https://sistacafe.com/summaries/preview/220004
https://sistacafe.com/summaries/preview/220005
https://sistacafe.com/summaries/preview/220006
https://sistacafe.com/summaries/preview/220007
https://sistacafe.com/summaries/preview/220008
https://sistacafe.com/summaries/preview/220009
https://sistacafe.com/summaries/preview/220010
https://sistacafe.com/summaries/preview/220011
https://sistacafe.com/summaries/preview/220012
https://sistacafe.com/summaries/preview/220013
https://sistacafe.com/summaries/preview/220014
https://sistacafe.com/summaries/preview/220015
https://sistacafe.com/summaries/preview/220016
https://sistacafe.com/summaries/preview/220017
https://sistacafe.com/summaries/preview/220018
https://sistacafe.com/summaries/preview/220019
https://sistacafe.com/summaries/preview/220080
https://sistacafe.com/summaries/preview/220081
https://sistacafe.com/summaries/preview/220082
https://sistacafe.com/summaries/preview/220083
https://sistacafe.com/summaries/preview/220084
https://sistacafe.com/summaries/preview/220085
https://sistacafe.com/summaries/preview/220086
https://sistacafe.com/summaries/preview/220087
https://sistacafe.com/summaries/preview/220088
https://sistacafe.com/summaries/preview/220089
https://sistacafe.com/summaries/preview/219994
https://sistacafe.com/summaries/preview/219995
https://sistacafe.com/summaries/preview/219997
https://sistacafe.com/summaries/preview/219996
https://sistacafe.com/summaries/preview/220022
https://sistacafe.com/summaries/preview/219998
https://sistacafe.com/summaries/preview/220021
https://sistacafe.com/summaries/preview/220020
https://sistacafe.com/summaries/preview/220023
https://sistacafe.com/summaries/preview/220024
https://sistacafe.com/summaries/preview/220025
https://sistacafe.com/summaries/preview/220026
https://sistacafe.com/summaries/preview/220027
https://sistacafe.com/summaries/preview/220028
https://sistacafe.com/summaries/preview/220029
https://sistacafe.com/summaries/preview/220030
https://sistacafe.com/summaries/preview/220031
https://sistacafe.com/summaries/preview/220032
https://sistacafe.com/summaries/preview/220033
https://sistacafe.com/summaries/preview/220034
https://sistacafe.com/summaries/preview/220035
https://sistacafe.com/summaries/preview/220036
https://sistacafe.com/summaries/preview/220037
https://sistacafe.com/summaries/preview/220038
https://sistacafe.com/summaries/preview/220039
https://sistacafe.com/summaries/preview/220040
https://sistacafe.com/summaries/preview/220041
https://sistacafe.com/summaries/preview/220042
https://sistacafe.com/summaries/preview/220043
https://sistacafe.com/summaries/preview/220044
https://sistacafe.com/summaries/preview/220048
https://sistacafe.com/summaries/preview/220051
https://sistacafe.com/summaries/preview/220049
https://sistacafe.com/summaries/preview/220052
https://sistacafe.com/summaries/preview/220050
https://sistacafe.com/summaries/preview/220054
https://sistacafe.com/summaries/preview/220055
https://sistacafe.com/summaries/preview/220060
https://sistacafe.com/summaries/preview/220056
https://sistacafe.com/summaries/preview/220065
https://sistacafe.com/summaries/preview/220057
https://sistacafe.com/summaries/preview/220078
https://sistacafe.com/summaries/preview/220066
https://sistacafe.com/summaries/preview/220053
https://sistacafe.com/summaries/preview/220068
https://sistacafe.com/summaries/preview/220059
https://sistacafe.com/summaries/preview/220069
https://sistacafe.com/summaries/preview/220077
https://sistacafe.com/summaries/preview/220062
https://sistacafe.com/summaries/preview/220071
https://sistacafe.com/summaries/preview/220063
https://sistacafe.com/summaries/preview/220072
https://sistacafe.com/summaries/preview/220064
https://sistacafe.com/summaries/preview/220076
https://sistacafe.com/summaries/preview/220073
https://sistacafe.com/summaries/preview/220067
https://sistacafe.com/summaries/preview/220074
https://sistacafe.com/summaries/preview/220070
https://sistacafe.com/summaries/preview/220075
https://sistacafe.com/summaries/preview/220079
https://sistacafe.com/summaries/preview/220102
https://sistacafe.com/summaries/preview/220106
https://sistacafe.com/summaries/preview/220107
https://sistacafe.com/summaries/preview/220108
https://sistacafe.com/summaries/preview/220109
https://sistacafe.com/summaries/preview/220110
https://sistacafe.com/summaries/preview/220111
https://sistacafe.com/summaries/preview/220112
https://sistacafe.com/summaries/preview/220113
https://sistacafe.com/summaries/preview/220114
https://sistacafe.com/summaries/preview/220092
https://sistacafe.com/summaries/preview/220094
https://sistacafe.com/summaries/preview/220097
https://sistacafe.com/summaries/preview/220098
https://sistacafe.com/summaries/preview/220099
https://sistacafe.com/summaries/preview/220100
https://sistacafe.com/summaries/preview/220101
https://sistacafe.com/summaries/preview/220096
https://sistacafe.com/summaries/preview/220103
https://sistacafe.com/summaries/preview/220104
https://sistacafe.com/summaries/preview/220048
https://sistacafe.com/summaries/preview/220050
https://sistacafe.com/summaries/preview/220051
https://sistacafe.com/summaries/preview/219882
https://sistacafe.com/summaries/preview/219852
https://sistacafe.com/summaries/preview/219853
https://sistacafe.com/summaries/preview/219856
https://www.readawrite.com/a/98daef69f8e29be4e41605c2c9a62c2b
https://www.readawrite.com/a/8efddb48243391e719153a8c549d1f56
https://www.readawrite.com/a/6a1ecf276db5ae5ce023a1f46061d209
https://www.readawrite.com/a/f3ebcc921b2d723e76076155dee60c11
https://www.readawrite.com/a/a2ab0a5ec243058c7001190af93559d2
https://www.readawrite.com/a/4159a0f386e527b85670136912a8104f
https://www.readawrite.com/a/30972df3c8bb679f2dcc74f43445195f
https://www.readawrite.com/a/f290608acdddf792e4c29385db6b9154
https://www.readawrite.com/a/f1e3410841babfa25c3d5fe720283195
https://www.readawrite.com/a/d0497f18d2b558c6fc4541b15e81ee4a
https://www.readawrite.com/a/c8a33281a5a1ac6726d6a390d7ab5327
https://www.readawrite.com/a/57509a190a774f17b3e2d05f4e57abed
https://www.readawrite.com/a/2cfb4b82853e0ee6f2036b1c16eac0e1
https://www.readawrite.com/a/f968817c5963f1176389978fe301b027
https://www.readawrite.com/a/a55ef62192c50800b209a29b7cfd8119
https://www.readawrite.com/a/30972df3c8bb679f2dcc74f43445195f
https://www.readawrite.com/a/f290608acdddf792e4c29385db6b9154
https://www.readawrite.com/a/f1e3410841babfa25c3d5fe720283195
https://www.readawrite.com/a/98daef69f8e29be4e41605c2c9a62c2b
https://www.readawrite.com/a/8efddb48243391e719153a8c549d1f56
https://www.readawrite.com/a/6a1ecf276db5ae5ce023a1f46061d209
https://www.readawrite.com/a/f3ebcc921b2d723e76076155dee60c11
https://www.readawrite.com/a/a2ab0a5ec243058c7001190af93559d2
https://www.readawrite.com/a/4159a0f386e527b85670136912a8104f
https://www.readawrite.com/a/59f023855f12efceba8617bb9eabd4a9
https://www.readawrite.com/a/983769f53fbe82f2d456823f5ef0b816
https://www.readawrite.com/a/4bde3f64395c50c712af6f06ca4eff36
https://www.readawrite.com/a/ab3d0efe648b908e632da3740dea3581
https://www.readawrite.com/a/41367b34654f6f8cd51db158edf6fbc5
https://www.readawrite.com/a/3bba04c5de0c3603bb23699473070123
https://www.readawrite.com/a/cf5cd4f9f04a10b176109da4bc60b191
https://www.alrahwanzahby.com
https://www.alrahwanzahby.com/نقل-عفش-جدة-و-مكه/
https://www.alrahwanzahby.com/افضل-شركة-نقل-عفش-بجدة/
https://www.alrahwanzahby.com/شركة-نقل-عفش-من-جدة-الى-الخرج/
https://www.alrahwanzahby.com/شركة-نقل-عفش-من-جدة-الى-تبوك/
https://www.alrahwanzahby.com/شركة-نقل-عفش-من-جدة-الى-نجران/
https://www.alrahwanzahby.com/شركة-نقل-عفش-من-جدة-الى-جازان/
https://www.alrahwanzahby.com/شركة-نقل-عفش-من-جدة-الى-القصيم-بريدة/
https://www.alrahwanzahby.com/نقل-عفش-من-جدة-الى-ابها-خميس-مشيط/
https://www.alrahwanzahby.com/شركة-نقل-عفش-من-جدة-الى-الطائف/
https://www.alrahwanzahby.com/شركة-نقل-عفش-من-جدة-الى-الرياض/
https://www.alrahwanzahby.com/شركة-نقل-عفش-من-جدة-الى-الخبر/
https://www.alrahwanzahby.com/شركة-نقل-عفش-من-جدة-الى-الدمام/
https://www.alrahwanzahby.com/نقل-عفش-من-جدة-الى-المدينة-المنورة/
https://www.alrahwanzahby.com/شركة-نقل-عفش-من-جدة-الى-الاحساء-الهفوف/
https://www.alrahwanzahby.com/شركة-نقل-عفش-من-جدة-الى-الجبيل/
https://www.alrahwanzahby.com/شركة-نقل-عفش-من-جدة-الى-الظهران/
https://www.alrahwanzahby.com/نقل-عفش-من-جدة-الى-حفر-الباطن/
https://www.alrahwanzahby.com/شركة-نقل-عفش-من-جدة-الى-الباحة/
https://www.alrahwanzahby.com/نقل-عفش-من-جدة-الى-الافلاج/
https://www.alrahwanzahby.com/نقل-عفش-من-جدة-الى-القطيف/
https://www.alrahwanzahby.com/شركة-نقل-عفش-من-جدة-الى-ضبا/
https://www.alrahwanzahby.com/نقل-عفش-من-جدة-الى-سكاكا-الجوف/
https://www.alrahwanzahby.com/نقل-عفش-من-جدة-الى-الدوادمى/
https://www.alrahwanzahby.com/شركة-نقل-عفش-من-جدة-الى-حقل/
https://www.alrahwanzahby.com/شركة-نقل-عفش-من-جدة-الى-العلا/
https://www.alrahwanzahby.com/شركة-نقل-عفش-من-جدة-الى-ينبع/
https://www.alrahwanzahby.com/نقل-عفش-من-جدة-الى-الدمام/
https://www.alrahwanzahby.com/شركة-نقل-عفش-بجدة/
https://www.alrahwanzahby.com/شركة-نقل-عفش-بجدة-حى-السنابل/
https://www.alrahwanzahby.com/شركة-نقل-عفش-بجدة-حى-الحمدانية/
https://www.alrahwanzahby.com/شركة-نقل-عفش-بجدة-حى-ابحر-الشمالية/
https://www.alrahwanzahby.com/شركة-نقل-عفش-بجدة-حى-ابحر-الجنوبية/
https://www.alrahwanzahby.com/شركة-نقل-عفش-بجدة-حى-الصفا/
https://www.alrahwanzahby.com/شركة-نقل-عفش-بجدة-حى-النعيم/
https://www.alrahwanzahby.com/شركة-نقل-عفش-بجدة-حى-الشاطئ/
https://www.alrahwanzahby.com/شركة-نقل-عفش-بجدة-حى-الحمراء/
https://www.alrahwanzahby.com/شركة-نقل-عفش-بجدة-حى-النهضة
https://www.alrahwanzahby.com/شركة-نقل-عفش-بجدة-حى-السامر/
https://www.alrahwanzahby.com/شركة-نقل-عفش-بجدة-حى-الاندلس/
https://www.alrahwanzahby.com/شركة-نقل-عفش-بجدة-حى-الاجواد/
https://www.alrahwanzahby.com/شركة-نقل-عفش-بجدة-حى-الواحة/
https://www.alrahwanzahby.com/شركة-نقل-عفش-بجدة-حى-العزيزية/
https://www.alrahwanzahby.com/شركة-نقل-عفش-بجدة-حى-النخيل/
https://www.alrahwanzahby.com/شركة-نقل-عفش-بجدة-حى-مشرفة/
https://www.alrahwanzahby.com/شركة-نقل-عفش-بجدة-حى-البوادى/
https://www.alrahwanzahby.com/شركة-نقل-عفش-بجدة-حى-الزمرد/
https://www.alrahwanzahby.com/شركة-نقل-عفش-بجدة-حى-اللؤلؤ/
https://www.alrahwanzahby.com/شركة-نقل-عفش-بجدة-حى-المرجان/
https://www.alrahwanzahby.com/شركة-نقل-عفش-بجدة-حى-الربوة/
https://www.alrahwanzahby.com/شركة-نقل-عفش-بجدة-حى-الزهراء/
https://www.alrahwanzahby.com/شركة-نقل-عفش-بجدة-حى-الكوثر/
https://www.alrahwanzahby.com/شركة-نقل-عفش-بجدة-حى-الخالدية/
https://www.alrahwanzahby.com/شركة-نقل-عفش-بجدة-حى-الرحمانية/
https://www.alrahwanzahby.com/شركة-نقل-عفش-بجدة-حى-السلامة/
https://www.alrahwanzahby.com/شركة-نقل-عفش-بجدة-حى-الاصالة/
https://www.alrahwanzahby.com/شركة-نقل-عفش-بجدة-حى-البشائر/
https://www.alrahwanzahby.com/شركة-نقل-عفش-بجدة-حى-الفلاح/
https://www.alrahwanzahby.com/شركة-نقل-عفش-بجدة-حى-الفروسية/
https://www.alrahwanzahby.com/شركة-نقل-عفش-بجدة-حى-بريمان/
https://www.alrahwanzahby.com/شركة-نقل-عفش-بجدة-حى-الريان/
https://www.alrahwanzahby.com/شركة-نقل-عفش-بجدة-حى-طيبة/
https://www.alrahwanzahby.com/شركة-نقل-عفش-بجدة-حى-الربيع/
https://www.alrahwanzahby.com/شركة-نقل-عفش-بجدة-حى-التوفيق/
https://www.alrahwanzahby.com/شركة-نقل-عفش-بجدة-حى-الياقوت/
https://www.alrahwanzahby.com/شركة-نقل-عفش-بجدة-حى-الفيصلية/
https://www.alrahwanzahby.com/شركة-نقل-عفش-بجدة-حى-المنتزه/
https://www.alrahwanzahby.com/شركة-نقل-عفش-بجدة-حى-السليمانية/
https://www.alrahwanzahby.com/شركة-نقل-عفش-بجدة-حى-الجوهرة/
https://www.alrahwanzahby.com/شركة-نقل-عفش-بجدة-حى-الفيحاء/
https://www.alrahwanzahby.com/شركة-نقل-عفش-بجدة-حى-الاجاويد/
https://www.alrahwanzahby.com/شركة-نقل-عفش-بجدة-حى-المحمدية/
https://www.alrahwanzahby.com/شركة-نقل-عفش-بجدة-حى-المنار/
https://www.alrahwanzahby.com/شركة-نقل-عفش-بجدة-حى-الروضة/
https://www.alrahwanzahby.com/شركة-نقل-عفش-بجدة-حى-الرحاب/
https://www.alrahwanzahby.com/شركة-نقل-عفش-بجدة-حى-النزهة/
https://www.alrahwanzahby.com/شركة-نقل-عفش-بجدة-حى-البساتين/
https://www.alrahwanzahby.com/شركة-نقل-عفش-بجدة-حى-الامواج/
https://www.alrahwanzahby.com/شركة-نقل-عفش-بجدة-حى-الصالحية/
https://www.alrahwanzahby.com/شركة-نقل-عفش-بجدة-حى-النسيم/
https://www.alrahwanzahby.com/شركة-نقل-عفش-بجدة-حى-الشروق/
https://www.alrahwanzahby.com/شركة-نقل-عفش-بجدة-حى-الفاروق/
https://www.alrahwanzahby.com/شركة-نقل-عفش-بجدة-حى-الشرفية/
https://www.alrahwanzahby.com/شركة-نقل-عفش-بجدة-حى-النزلة-الشرقية/
https://www.alrahwanzahby.com/شركة-نقل-عفش-بجدة-حى-الشرفية/
https://www.alrahwanzahby.com/شركة-نقل-عفش-بجدة-حى-النزلة-اليمانية/
https://www.alrahwanzahby.com/شركة-نقل-عفش-بجدة-حى-ابرق-الرغامة/
https://www.alrahwanzahby.com/شركة-نقل-عفش-بجدة-حى-الروابي/
https://www.alrahwanzahby.com/شركة-نقل-عفش-بجدة-حى-البغدادية-الغربية/
https://www.alrahwanzahby.com/شركة-نقل-عفش-بجدة-حى-الرويس/
https://www.alrahwanzahby.com/شركة-نقل-عفش-بجدة-حى-السروات/
https://www.alrahwanzahby.com/شركة-نقل-عفش-بجدة-حى-مدائن-الفهد/
https://www.alrahwanzahby.com/شركة-نقل-عفش-بجدة-حى-الثعالبة/
https://www.alrahwanzahby.com/شركة-نقل-عفش-بجدة-حى-الوزيرية/
https://www.alrahwanzahby.com/شركة-نقل-عفش-بجدة-حى-الخمرة/
https://www.alrahwanzahby.com/شركة-نقل-عفش-بجدة-حى-قويزه/
https://www.alrahwanzahby.com/شركة-نقل-عفش-بجدة-حى-الجامعة/
https://www.alrahwanzahby.com/شركة-نقل-عفش-بجدة-حى-بنى-مالك/
https://www.alrahwanzahby.com/شركة-نقل-عفش-بجدة-حى-الهنداوية/
https://tinyurl.com/24qyk7q4
https://tinyurl.com/2b9z2mqv
https://tinyurl.com/26hl9a8g
https://tinyurl.com/2dnky2cg
https://tinyurl.com/2y5gy7l4
https://tinyurl.com/2yxb9xoa
https://tinyurl.com/2bnjdypr
https://tinyurl.com/26p8cu33
https://tinyurl.com/23huuuds
https://tinyurl.com/26gmetjd
https://tinyurl.com/22rpwwbm
https://tinyurl.com/25qhgvh7
https://tinyurl.com/22cwukov
https://tinyurl.com/2ckqpy3x
https://tinyurl.com/24ko6vnb
https://tinyurl.com/27f68e4y
https://tinyurl.com/234ea4yj
https://tinyurl.com/288b7ank
https://tinyurl.com/28pg3box
https://tinyurl.com/2bv89xcg
https://tinyurl.com/25hflo5w
https://tinyurl.com/23bevqhh
https://tinyurl.com/247jvllg
https://tinyurl.com/28hgk8zw
https://tinyurl.com/2yr9p8nq
https://tinyurl.com/22×9r5pj
https://tinyurl.com/26xb36vu
https://tinyurl.com/22wswrge
https://tinyurl.com/27ve2d7d
https://tinyurl.com/29psqbrp
https://tinyurl.com/29rjcp4n
https://tinyurl.com/2834mpyo
https://tinyurl.com/269enq27
https://tinyurl.com/24tzwpxb
https://tinyurl.com/29aawxk6
https://tinyurl.com/2xzctjsd
https://tinyurl.com/244nfdl7
https://tinyurl.com/2b7zlgnn
https://tinyurl.com/2bf99r2e
https://tinyurl.com/22kb6eq8
https://tinyurl.com/2af8wa93
https://tinyurl.com/28kd3gj8
https://tinyurl.com/2d832uxv
https://tinyurl.com/229n5nz7
https://tinyurl.com/2y5rhz2h
https://tinyurl.com/25tty7gx
https://tinyurl.com/23ogzzv9
https://tinyurl.com/229u84jf
https://tinyurl.com/2yb6c6xj
https://tinyurl.com/22xqkzg5
https://tinyurl.com/26t4jolg
https://tinyurl.com/2a3xtt88
https://tinyurl.com/2yh2tcz8
https://tinyurl.com/23m89kyo
https://tinyurl.com/2xquveg2
https://tinyurl.com/2xh9l9q5
https://tinyurl.com/2yyehaqz
https://tinyurl.com/2d4wh7we
https://tinyurl.com/23df95gq
https://tinyurl.com/2dertqnj
https://tinyurl.com/28rctx65
https://tinyurl.com/2yey328q
https://tinyurl.com/22gk9mhy
https://tinyurl.com/23jkl4rp
https://tinyurl.com/2a5zxkv3
https://tinyurl.com/28kojrxl
https://tinyurl.com/27xjcamh
https://tinyurl.com/25sx4ott
https://tinyurl.com/2afkfkng
https://tinyurl.com/2ccl2mpp
https://tinyurl.com/25fzt2nr
https://tinyurl.com/286ubt3x
https://tinyurl.com/2a6uwtmm
https://tinyurl.com/22uehkem
https://tinyurl.com/27vpznlq
https://tinyurl.com/2y4987yp
https://tinyurl.com/27xmuy6l
https://tinyurl.com/2d7k5n6d
https://tinyurl.com/2xqplc6t
https://tinyurl.com/242chu3j
https://tinyurl.com/28g4h5ne
https://tinyurl.com/26cmnbgt
https://tinyurl.com/257vpft7
https://tinyurl.com/24svllpl
https://tinyurl.com/257vpft7
https://tinyurl.com/2xzlh2uv
https://tinyurl.com/2yj2weqp
https://tinyurl.com/2799gusk
https://tinyurl.com/2d7krjbm
https://tinyurl.com/2bozx5o5
https://tinyurl.com/25zgy6tc
https://tinyurl.com/2ax3a5l6
https://tinyurl.com/25xynklh
https://tinyurl.com/29×2wlrs
https://tinyurl.com/29u3973q
https://tinyurl.com/256yphna
https://tinyurl.com/28dmrluu
https://tinyurl.com/254lq8vo
https://tinyurl.com/268heeee
https://is.gd/P6ierw
https://is.gd/ZkttQn
https://is.gd/IqUFq8
https://is.gd/kd11jp
https://is.gd/b7uTlB
https://is.gd/N3Lc5H
https://is.gd/9HdYtE
https://is.gd/7PfeR6
https://is.gd/2dF7pz
https://is.gd/vmCccC
https://is.gd/xxuQ6t
https://is.gd/FnWmSA
https://is.gd/VEzncn
https://is.gd/lOqRyf
https://is.gd/Uovt1M
https://is.gd/QEaCTQ
https://is.gd/twGJ18
https://is.gd/mzzrlW
https://is.gd/KH9SNi
https://is.gd/h3U3JR8
https://is.gd/GRja5Y
https://is.gd/XoNjgT
https://is.gd/iuKvmT
https://is.gd/rTuLqa
https://is.gd/brHTCI
https://is.gd/Ll3wSk
https://is.gd/l9CQfF
https://is.gd/9bgF6z
https://is.gd/urmPbA
https://is.gd/UYZBI8
https://is.gd/HxtBXY
https://is.gd/K2pwSm
https://is.gd/yhzGzb
https://is.gd/8nDQAu
https://is.gd/v74syc
https://is.gd/Ob5KQT
https://is.gd/2qQ69L
https://is.gd/oiOc7r
https://is.gd/7EOGFY
https://is.gd/kTGhss
https://is.gd/3jrFrn
https://is.gd/D4zWYM
https://is.gd/jWyU8d
https://is.gd/bpwP7L
https://is.gd/VCwsPW
https://is.gd/1F3RH0
https://is.gd/66j63R
https://is.gd/dF7m7Y
https://is.gd/ZrvTz0
https://is.gd/Uj6Bkh
https://is.gd/QyIHUD
https://is.gd/rAsR2o
https://is.gd/C0lnj3
https://is.gd/T0GJn0
https://is.gd/HnNmPD
https://is.gd/LtcJ2g
https://is.gd/2ZEPvY
https://is.gd/MVAuHj
https://is.gd/VnHSOj
https://is.gd/pRE7Q3
https://is.gd/VtaqDV
https://is.gd/GZSgaw
https://is.gd/Ihdx7J
https://is.gd/lUg6GA
https://is.gd/3OZ3po
https://is.gd/RjI1Ru
https://is.gd/DGiXT1
https://is.gd/yZfc7e
https://is.gd/Z2DBgA
https://is.gd/RIdU5Z
https://is.gd/QSgnji
https://is.gd/35rpSd
https://is.gd/S5cEDR
https://is.gd/4Gsq7q
https://is.gd/HcHcnB
https://is.gd/mErTXx
https://is.gd/98w08U
https://is.gd/Istjtp
https://is.gd/wFaREU
https://is.gd/bdz3lR
https://is.gd/3jBUwx
https://is.gd/G8Q2gZ
https://is.gd/2lVZfH
https://is.gd/9FktZe
https://is.gd/2lVZfH
https://is.gd/Vwhxn8
https://is.gd/sJbqzJ
https://is.gd/dNqhJB
https://is.gd/7R96lr
https://is.gd/ltS1Qy
https://is.gd/6o89L4
https://is.gd/s71aP0
https://is.gd/mpTAX5
https://is.gd/bB5EmJ
https://is.gd/6cUknr
https://is.gd/M9yoOv
https://is.gd/SDlaME
https://is.gd/OD7aMK
https://is.gd/ZbQnJR
https://v.gd/tKLGS6
https://v.gd/ZC3KCV
https://v.gd/L3ffS3
https://v.gd/8zEBNG
https://v.gd/eY3mwy
https://v.gd/YbbzQX
https://v.gd/uYvvGl
https://v.gd/snyUM8
https://v.gd/jrGV8t
https://v.gd/R3Bk81
https://v.gd/QBJPVS
https://v.gd/ziQapI
https://v.gd/NnmX0p
https://v.gd/k311DU
https://v.gd/LD12hT
https://v.gd/QMcg3l
https://v.gd/eumKdI
https://v.gd/PwsnIn
https://v.gd/IVFdOa
https://v.gd/9UXB1A
https://v.gd/IrDXke
https://v.gd/j7wCLh
https://v.gd/tXG5ft
https://v.gd/PEZgbg
https://v.gd/IkuZtV
https://v.gd/LpIoJu
https://v.gd/OXxZ63
https://v.gd/HCJtfO
https://v.gd/h4xX2x
https://v.gd/WPyg3H
https://v.gd/SptdKK
https://v.gd/3VpJko
https://v.gd/bwLKT4
https://v.gd/K1IXIN
https://v.gd/2adh06
https://v.gd/w9QF1c
https://v.gd/8nfB4Q
https://v.gd/BxoKyw
https://v.gd/WkHhoO
https://v.gd/VQDuCJ
https://v.gd/yL03uy
https://v.gd/yNBfCG
https://v.gd/Cj8r7l
https://v.gd/r0FwA0
https://v.gd/BvwMCu
https://v.gd/iuo6Ka
https://v.gd/0k3LYU
https://v.gd/eRR4PH
https://v.gd/6yP0VU
https://v.gd/CbeZQ9
https://v.gd/qUhtKi
https://v.gd/RDTxNb
https://v.gd/YdmBhs
https://v.gd/frG3JH
https://v.gd/oCzx8I
https://v.gd/1sPBgW
https://v.gd/3z8mQq
https://v.gd/mYl0e3
https://v.gd/Q1kSYg
https://v.gd/BdxUGP
https://v.gd/VjA7re
https://v.gd/QkH8iu
https://v.gd/GvPRWk
https://v.gd/8HRMU8
https://v.gd/0g9S9j
https://v.gd/yN6FIf
https://v.gd/sWhXtN
https://v.gd/diV0oD
https://v.gd/W4zVYU
https://v.gd/XrTkdE
https://v.gd/zD1Tfw
https://v.gd/IY8q0y
https://v.gd/Xl2Vrc
https://v.gd/Ebzoxo
https://v.gd/FeHQai
https://v.gd/2f6qPW
https://v.gd/Ey90kN
https://v.gd/OvPGjh
https://v.gd/1UAfCW
https://v.gd/eCuqid
https://v.gd/e9SiJn
https://v.gd/yJIPHi
https://v.gd/X1QQ4X
https://v.gd/Kqyn9d
https://v.gd/X1QQ4X
https://v.gd/bGgXbX
https://v.gd/YpqigV
https://v.gd/nWovfw
https://v.gd/1RGD3I
https://v.gd/CV9kGv
https://v.gd/IvHMvi
https://v.gd/VFYQjg
https://v.gd/3IpA5b
https://v.gd/VEKk54
https://v.gd/vfVu6o
https://v.gd/ckfAdq
https://v.gd/dAgtpo
https://v.gd/Nvr60d
https://v.gd/CfJMER
https://clck.ru/3PLBgQ
https://clck.ru/3PLBgU
https://clck.ru/3PLBgW
https://clck.ru/3PLBgZ
https://clck.ru/3PLBga
https://clck.ru/3PLBgb
https://clck.ru/3PLBgc
https://clck.ru/3PLBge
https://clck.ru/3PLBgi
https://clck.ru/3PLBgk
https://clck.ru/3PLBgp
https://clck.ru/3PLBgq
https://clck.ru/3PLBgs
https://clck.ru/3PLBgt
https://clck.ru/3PLBgu
https://clck.ru/3PLBgw
https://clck.ru/3PLBgy
https://clck.ru/3PLBh3
https://clck.ru/3PLBh4
https://clck.ru/3PLBh7
https://clck.ru/3PLBhE
https://clck.ru/3PLBhH
https://clck.ru/3PLBhJ
https://clck.ru/3PLBhK
https://clck.ru/3PLBhL
https://clck.ru/3PLBhM
https://clck.ru/3PLBhN
https://clck.ru/3PLBhS
https://clck.ru/3PLBhU
https://clck.ru/3PLBhW
https://clck.ru/3PLBhY
https://clck.ru/3PLBhZ
https://clck.ru/3PLBha
https://clck.ru/3PLBhd
https://clck.ru/3PLBhe
https://clck.ru/3PLBhi
https://clck.ru/3PLBhm
https://clck.ru/3PLBhn
https://clck.ru/3PLBho
https://clck.ru/3PLBhp
https://clck.ru/3PLBhq
https://clck.ru/3PLBhs
https://clck.ru/3PLBht
https://clck.ru/3PLBhy
https://clck.ru/3PLBi3
https://clck.ru/3PLBi8
https://clck.ru/3PLBi9
https://clck.ru/3PLBiB
https://clck.ru/3PLBiC
https://clck.ru/3PLBiD
https://clck.ru/3PLBiE
https://clck.ru/3PLBiF
https://clck.ru/3PLBiJ
https://clck.ru/3PLBiK
limited
limited
limited
https://clck.ru/3PLBiM
https://clck.ru/3PLBiP
limited
https://clck.ru/3PLBiX
limited
https://clck.ru/3PLBiZ
https://clck.ru/3PLBic
limited
https://clck.ru/3PLBig
https://clck.ru/3PLBih
https://clck.ru/3PLBii
https://clck.ru/3PLBij
https://clck.ru/3PLBik
limited
limited
https://clck.ru/3PLBim
https://clck.ru/3PLBip
limited
https://clck.ru/3PLBir
limited
https://clck.ru/3PLBis
https://clck.ru/3PLBit
https://clck.ru/3PLBiu
https://clck.ru/3PLBix
https://clck.ru/3PLBiy
https://clck.ru/3PLBj2
https://clck.ru/3PLBj5
https://clck.ru/3PLBj2
https://clck.ru/3PLBj6
https://clck.ru/3PLBjA
https://clck.ru/3PLBjF
https://clck.ru/3PLBjH
https://clck.ru/3PLBjJ
https://clck.ru/3PLBjK
https://clck.ru/3PLBjP
https://clck.ru/3PLBjR
https://clck.ru/3PLBjS
https://clck.ru/3PLBjV
https://clck.ru/3PLBjW
https://clck.ru/3PLBjZ
https://clck.ru/3PLBjb
https://clck.ru/3PLBjc
https://da.gd/ft6bJ
https://da.gd/ivnR
https://da.gd/4eb3c
https://da.gd/g4VzEA
https://da.gd/tFRBUu
https://da.gd/QrHUq
https://da.gd/g5En
https://da.gd/TIUMd
https://da.gd/WLgOY
https://da.gd/srVOw
https://da.gd/cLSEY
https://da.gd/ZqTAFR
https://da.gd/gGy30
https://da.gd/E4Cu
https://da.gd/XHLi
https://da.gd/5U1EHO
https://da.gd/IKlQmx
https://da.gd/0Mgvx
https://da.gd/W9cej
https://da.gd/gkBtna
https://da.gd/4sWJIO
https://da.gd/S0x2dq
https://da.gd/ibE9p
https://da.gd/yHWdp
https://da.gd/6uZOI
https://da.gd/pz4lx
https://da.gd/gLZgT1
https://da.gd/z9Y3K
https://da.gd/tiQ3A
https://da.gd/Y1hqX
https://da.gd/4DjVE
https://da.gd/MNDtE5
https://da.gd/ZYOAdW
https://da.gd/BrHJY
https://da.gd/JMsHHF
https://da.gd/El7g
https://da.gd/4MxUm
https://da.gd/t1vebe
https://da.gd/Y9xoY
https://da.gd/PBGZWY
https://da.gd/5FXrx
https://da.gd/4pMdyN
https://da.gd/vckMPN
https://da.gd/hyXaB2
https://da.gd/N0RbD
https://da.gd/aL9pFO
https://da.gd/tIeLHR
https://da.gd/nnfMO
https://da.gd/wsOv
https://da.gd/bddSI
https://da.gd/TMQ01P
https://da.gd/ylF1Z
https://da.gd/TgTzcX
https://da.gd/MLwp30
https://da.gd/JHMN
https://da.gd/tL8UBQ
https://da.gd/CrllQ
https://da.gd/7hIK5O
https://da.gd/DJMTiQ
https://da.gd/EKf5N
https://da.gd/sDhlO
https://da.gd/syToxH
https://da.gd/EU8DO
https://da.gd/XnMwue
https://da.gd/g6wWJk
https://da.gd/2ljNH
https://da.gd/5yJ2s2
https://da.gd/WCQnn
https://da.gd/NnXIF
https://da.gd/kVtTI
https://da.gd/wwMyv
https://da.gd/fhZMe2
https://da.gd/IhvXX
https://da.gd/HWGLz
https://da.gd/chSWs
https://da.gd/ME4ai
https://da.gd/vLYJ0c
https://da.gd/HdtMbb
https://da.gd/icIr6n
https://da.gd/qkhX3z
https://da.gd/HpmU
https://da.gd/kUdmFa
https://da.gd/ng2W7u
https://da.gd/SUVo
https://da.gd/ng2W7u
https://da.gd/0Pjv4c
https://da.gd/wZcBx
https://da.gd/8CoHA
https://da.gd/6tIbu
https://da.gd/3ILXjK
https://da.gd/hUC4g
https://da.gd/dQ7JGt
https://da.gd/S5Jil0
https://da.gd/BRLCxD
https://da.gd/xJyVJ6
https://da.gd/3VPJr
https://da.gd/12xkw4
https://da.gd/wqE80
https://da.gd/sPZYvf
https://ulvis.net/IQug
https://ulvis.net/2LKQ
https://ulvis.net/sAYq
https://ulvis.net/dT1y
https://ulvis.net/tgPm
https://nz.sa/sKcze
https://nz.sa/YHHSe
https://nz.sa/FyMwf
https://nz.sa/qOnsS
https://nz.sa/GCBuM
https://nz.sa/yRNvM
https://nz.sa/OLUpr
https://nz.sa/fFjrz
https://nz.sa/VgyNU
https://nz.sa/FKRRb
https://nz.sa/JKtQt
https://nz.sa/iegef
https://nz.sa/pfBap
https://nz.sa/MgQou
https://nz.sa/JDPPJ
https://nz.sa/OKNaf
https://nz.sa/oXsbL
https://nz.sa/yVZVi
https://nz.sa/cxwWl
https://nz.sa/WjVzn
https://nz.sa/JkEze
https://nz.sa/glHvD
https://nz.sa/WsVwG
https://nz.sa/BZhSr
https://nz.sa/HLyiN
https://nz.sa/HAxmq
https://nz.sa/MPsuw
https://nz.sa/HabKT
https://nz.sa/gkmQF
https://nz.sa/HbaAC
https://nz.sa/yvvtR
https://nz.sa/IJXuO
https://nz.sa/DFigo
https://nz.sa/TajKc
https://nz.sa/JHpyM
https://nz.sa/WDUxw
https://nz.sa/ItQdU
https://nz.sa/BiyQB
https://nz.sa/eTkyn
https://nz.sa/DXitY
https://nz.sa/XAhSp
https://nz.sa/pKpho
https://nz.sa/kAZDD
https://nz.sa/FGEVO
https://nz.sa/EsxSi
https://nz.sa/QaZdC
https://nz.sa/AqGrf
https://nz.sa/dEajv
https://nz.sa/RMlNm
https://nz.sa/YYoIw
https://nz.sa/qaPqS
https://nz.sa/DCnlE
https://nz.sa/VZAEM
https://nz.sa/umZsE
https://nz.sa/ukHAA
https://nz.sa/mswpt
https://nz.sa/ctUGN
https://nz.sa/IvGjO
https://nz.sa/Ahmwm
https://nz.sa/qbQYW
https://nz.sa/hmIQV
https://nz.sa/eCRrC
https://nz.sa/JjcqE
https://nz.sa/qSizr
https://nz.sa/YceUR
https://nz.sa/ntbZJ
https://nz.sa/CMzxV
https://nz.sa/oIVyu
https://nz.sa/egqHV
https://nz.sa/IeLct
https://nz.sa/KLfUf
https://nz.sa/PdwOu
https://nz.sa/BITTH
https://nz.sa/stJOT
https://nz.sa/SyxnV
https://nz.sa/gYQFe
https://nz.sa/xAhrn
https://nz.sa/vZErO
https://nz.sa/KjLPe
https://nz.sa/JLUXk
https://nz.sa/HRNkF
https://nz.sa/wJDmP
https://nz.sa/UXgxx
https://nz.sa/eAUPm
https://nz.sa/UXgxx
https://nz.sa/eDMcz
https://nz.sa/sJeGj
https://nz.sa/iobSO
https://nz.sa/KDWmK
https://nz.sa/PmKzj
https://nz.sa/UiQRB
https://nz.sa/BJXkb
https://nz.sa/pnTRG
https://nz.sa/XJTra
https://nz.sa/KSYzi
https://nz.sa/gOPdB
https://nz.sa/rNoJh
https://nz.sa/MkHVv
https://nz.sa/OGrfh
https://www.bareeq-clean.com
https://www.bareeq-clean.com/شركة-تنظيف-بالبخار-بجدة-تنظيف-الفلل/
https://www.bareeq-clean.com/شركة-تنظيف-شقق-فلل-منازل-بجدة/
https://www.bareeq-clean.com/شركة-تنظيف-مجالس-كنب-بالبخار-بجدة/
https://www.bareeq-clean.com/شركة-تنظيف-كنب-بالبخار-بجدة/
https://www.bareeq-clean.com/أرخص-شركة-تنظيف-المنازل-بجدة/
https://www.bareeq-clean.com/شركة-تنظيف-خزانات-بجدة-غسيل-تعقيم/
https://www.bareeq-clean.com/أفضل-شركة-تنظيف-الخزانات-في-جدة/
https://www.bareeq-clean.com/شركة-مكافحة-و-رش-حشرات-بجدة/
https://www.bareeq-clean.com/شركة-رش-مبيدات-و-مكافحة-حشرات-بجدة/
https://www.bareeq-clean.com/افضل-شركة-تنظيف-مساجد-بجدة/
https://www.bareeq-clean.com/أفضل-شركة-تنظيف-بالباحة/
https://www.bareeq-clean.com/شركة-تنظيف-خزانات-بالباحة/
https://www.bareeq-clean.com/شركة-تنظيف-وتعقيم-خزانات-بالباحة/
https://www.bareeq-clean.com/شركة-مكافحة-حشرات-رش-مبيدات-بالباحة/
https://www.bareeq-clean.com/شركة-تنظيف-منازل-برابغ/
https://www.bareeq-clean.com/شركة-تنظيف-خزانات-برابغ/
https://www.bareeq-clean.com/شركة-مكافحة-حشرات-رش-مبيدات-برابغ/
https://www.bareeq-clean.com/شركة-تنظيف-منازل-فلل-بالليث/
https://www.bareeq-clean.com/شركة-تنظيف-خزانات-بالليث/
https://www.bareeq-clean.com/شركة-مكافحة-حشرات-رش-مبيدات-بالليث/
https://www.bareeq-clean.com/شركة-تنظيف-بخليص/
https://www.bareeq-clean.com/شركة-تنظيف-خزانات-بخليص/
https://www.bareeq-clean.com/شركة-مكافحة-حشرات-رش-مبيدات-بخليص/
https://www.bareeq-clean.com/شركة-تنظيف-بعسفان/
https://www.bareeq-clean.com/شركة-تنظيف-خزانات-بعسفان/
https://www.bareeq-clean.com/شركة-مكافحة-حشرات-رش-مبيدات-بعسفان/
https://www.bareeq-clean.com/شركة-تنظيف-بالبخار-حي-المرجان-جدة/
https://www.bareeq-clean.com/شركة-تنظيف-بالبخار-حي-الصفا-جدة/
https://www.bareeq-clean.com/شركة-تنظيف-بالبخار-حي-أبحر-الجنوبيه/
https://www.bareeq-clean.com/شركة-تنظيف-بالبخار-حي-أبحر-الشماليه/
https://www.bareeq-clean.com/شركة-تنظيف-بالبخار-حي-المروة-جدة/
https://www.bareeq-clean.com/شركة-تنظيف-بالبخار-حي-الشاطئ-جدة/
https://www.bareeq-clean.com/شركة-تنظيف-بالبخار-حي-النسيم-جدة/
https://www.bareeq-clean.com/شركة-تنظيف-بالبخار-حي-الحمراء-جدة/
https://www.bareeq-clean.com/شركة-تنظيف-بالبخار-حي-السلامه-جدة/
https://www.bareeq-clean.com/شركة-تنظيف-بالبخار-حي-المحمدية-جدة/
https://www.bareeq-clean.com/شركة-تنظيف-بالبخار-حي-النعيم-جدة/
https://www.bareeq-clean.com/شركة-تنظيف-بالبخار-حي-الحمدانيه-جدة/
https://www.bareeq-clean.com/شركة-تنظيف-بالبخار-حي-النهضة-جدة/
https://www.bareeq-clean.com/شركة-تنظيف-بالبخار-حي-الخالديه-جدة/
https://www.bareeq-clean.com/شركة-تنظيف-بالبخار-حي-الروضه-جدة/
https://www.bareeq-clean.com/شركة-تنظيف-بالبخار-حي-الفيصلية-جدة/
https://www.bareeq-clean.com/شركة-تنظيف-بالبخار-حي-التيسير-جدة/
https://www.bareeq-clean.com/شركة-تنظيف-بالبخار-حي-الورود-جدة/
https://www.bareeq-clean.com/شركة-تنظيف-بالبخار-حي-العزيزية-جدة/
https://www.bareeq-clean.com/شركة-تنظيف-بالبخار-حي-الفروسية-جدة/
https://www.bareeq-clean.com/شركة-تنظيف-بالبخار-حي-الاجاويد-جدة/
https://www.bareeq-clean.com/شركة-تنظيف-بالبخار-حي-النزهه-جدة/
https://www.bareeq-clean.com/شركة-تنظيف-بالبخار-حي-البساتين-جدة/
https://www.bareeq-clean.com/شركة-تنظيف-بالبخار-حي-البوادي-جدة/
https://www.bareeq-clean.com/شركة-تنظيف-بالبخار-حي-السنابل-جدة/
https://www.bareeq-clean.com/شركة-تنظيف-بالبخار-حي-الأندلس-جدة/
https://www.bareeq-clean.com/شركة-تنظيف-بالبخار-حي-مشرفه-جدة/
https://www.bareeq-clean.com/شركة-تنظيف-بالبخار-حي-الزهراء-جدة/
https://www.bareeq-clean.com/شركة-تنظيف-بالبخار-حي-الجامعه-جدة/
https://www.bareeq-clean.com/تنسيق-حدائق-بالرياض/
https://www.bareeq-clean.com/شركة-تنظيف-الواجهات-الزجاجية-بجدة/
https://www.bareeq-clean.com/سباك-الرياض-معلم-سباكة-صيانة-تصليح/
https://www.bareeq-clean.com/شركة-فك-تركيب-تنظيف-مكيفات-بالرياض/
https://www.bareeq-clean.com/شركة-مكافحة-حشرات-رش-مبيدات-بالرياض/
https://www.bareeq-clean.com/شركة-تنظيف-منازل-بالرياض-بالبخار/
https://www.bareeq-clean.com/شركة-تنظيف-خزانات-بالرياض/
https://www.bareeq-clean.com/شركة-تنظيف-بالقنفذة/
https://www.bareeq-clean.com/شركة-تنظيف-خزانات-بالقنفذة/
https://www.bareeq-clean.com/شركة-مكافحة-حشرات-رش-مبيدات-بالقنفذة/
https://www.bareeq-clean.com/شركة-تنظيف-صيانة-تركيب-مكيفات-بالقنفذ/
https://www.bareeq-clean.com/شركة-تنظيف-المنازل-بحائل/
https://www.bareeq-clean.com/شركة-مكافحة-حشرات-رش-مبيبدات-بحائل/
https://www.bareeq-clean.com/شركة-تنظيف-صيانة-تركيب-مكيفات-بالقصيم/
https://www.bareeq-clean.com/شركة-تنظيف-بالقصيم-بريدة/
https://www.bareeq-clean.com/شركة-تنظيف-خزانات-بالقصيم-بريدة/
https://www.bareeq-clean.com/شركة-مكافحة-حشرات-رش-مبيدات-بالقصيم/
https://www.bareeq-clean.com/شركة-تنظيف-صيانة-تركيب-مكيفات-بريدة/
https://www.bareeq-clean.com/شركة-تنظيف-فى-دبي-بالبخار/
https://www.bareeq-clean.com/شركة-مكافحة-حشرات-فى-دبى-رش-مبيدات/
https://www.bareeq-clean.com/شركة-تنظيف-خزانات-في-دبى/
https://www.bareeq-clean.com/شركة-مكافحة-حشرات-في-أبوظبي/
https://www.bareeq-clean.com/شركة-تنظيف-خزانات-في-ابوظبي/
https://www.bareeq-clean.com/شركة-تنظيف-في-ابوظبي-نظافة-بالبخار/
https://www.bareeq-clean.com/شركة-تنظيف-فى-الشارقة-نظافة-بالبخار/
https://www.bareeq-clean.com/شركة-مكافحة-حشرات-فى-الشارقة-رش-مبيدات/
https://www.bareeq-clean.com/شركة-تنظيف-خزانات-في-الشارقة/
https://www.bareeq-clean.com/شركة-تنظيف-فى-عجمان/
https://www.bareeq-clean.com/شركة-مكافحة-حشرات-فى-عجمان/
https://www.bareeq-clean.com/شركة-تنظيف-خزانات-فى-عجمان/
https://www.bareeq-clean.com/شركة-تنظيف-في-رأس-الخيمة/
https://www.bareeq-clean.com/شركة-مكافحة-حشرات-فى-راس-الخيمة/
https://www.bareeq-clean.com/شركة-تنظيف-خزانات-فى-راس-الخيمة/
https://www.bareeq-clean.com/شركة-تنظيف-فى-الفجيرة/
https://www.bareeq-clean.com/شركة-مكافحة-حشرات-في-الفجيرة/
https://www.bareeq-clean.com/شركة-تنظيف-خزانات-في-الفجيرة/
https://www.bareeq-clean.com/شركة-تنظيف-بأم-القيوين/
https://www.bareeq-clean.com/شركة-مكافحة-حشرات-في-أم-القيوين/
https://www.bareeq-clean.com/شركة-تنظيف-خزانات-في-أم-القيوين/
https://www.bareeq-clean.com/شركة-تنظيف-فى-العين/
https://www.bareeq-clean.com/شركة-مكافحة-حشرات-في-العين/
https://www.bareeq-clean.com/شركة-تنظيف-خزانات-في-العين/
https://www.bareeq-clean.com/شركة-تنظيف-في-مصفح/
https://www.bareeq-clean.com/شركة-تنظيف-خزانات-في-مصفح/
https://www.bareeq-clean.com/شركة-مكافحة-حشرات-في-مصفح/
https://www.bareeq-clean.com/شركة-تنظيف-في-بني-ياس/
https://www.bareeq-clean.com/شركة-تنظيف-خزانات-في-بني-ياس/
https://www.bareeq-clean.com/شركة-مكافحة-حشرات-بني-ياس/
https://www.bareeq-clean.com/شركة-تنظيف-منازل-بالطائف/
https://www.bareeq-clean.com/شركة-تنظيف-بالطائف/
https://www.bareeq-clean.com/شركة-تنظيف-خزانات-بالطائف/
https://www.bareeq-clean.com/شركة-تنظيف-صيانة-تركيب-مكيفات-بالطائف/
https://www.bareeq-clean.com/شركة-مكافحة-حشرات-رش-مبيدات-بالطائف/
https://www.bareeq-clean.com/شركة-مكافحة-حشرات-رش-مبيدات-بمسقط/
https://www.bareeq-clean.com/شركة-تنظيف-بسلطنة-عُمان/
https://www.bareeq-clean.com/شركة-مكافحة-حشرات-بسلطنة-عُمان/
https://www.bareeq-clean.com/شركة-تنظيف-خزانات-بسلطنة-عُمان/
https://www.bareeq-clean.com/شركة-تنظيف-بالكويت/
https://www.bareeq-clean.com/رش-مبيدات-الكويت-مكافحة-حشرات-الكويت/
https://www.bareeq-clean.com/شركة-تنظيف-خزانات-فى-الكويت/
https://www.bareeq-clean.com/شركة-تنظيف-بالبحرين/
https://www.bareeq-clean.com/شركة-مكافحة-حشرات-رش-مبيدات-بالبحرين/
https://www.bareeq-clean.com/شركة-تنظيف-خزانات-بالبحرين/
https://www.bareeq-clean.com/أفضل-شركة-تنظيف-في-قطر/
https://www.bareeq-clean.com/أفضل-شركة-تنظيف-بالدوحة/
https://www.bareeq-clean.com/شركة-مكافحة-حشرات-رش-مبيدات-في-قطر/
https://www.bareeq-clean.com/شركة-تنظيف-خزانات-في-قطر/
https://www.bareeq-clean.com/شركة-تنظيف-صيانة-تركيب-مكيفات-بالمدين/
https://www.bareeq-clean.com/شركة-تنظيف-صيانة-تركيب-مكيفات-بجازان/
https://www.bareeq-clean.com/شركة-تنظيف-صيانة-تركيب-مكيفات-بنجران/
https://www.bareeq-clean.com/شركة-تنظيف-صيانة-تركيب-مكيفات-بالقطيف/
https://www.bareeq-clean.com/شركة-تنظيف-صيانة-تركيب-مكيفات-بالخرج/
https://www.bareeq-clean.com/شركة-تنظيف-صيانة-تركيب-مكيفات-بالخبر/
https://www.bareeq-clean.com/شركة-تنظيف-صيانة-تركيب-مكيفات-بمكة/
https://www.bareeq-clean.com/شركة-تنظيف-صيانة-تركيب-مكيفات-بالدمام/
https://www.bareeq-clean.com/أفضل-شركة-تنظيف-بسبت-العلايا/
https://www.bareeq-clean.com/افضل-شركة-تنظيف-بالمخواه/
https://www.bareeq-clean.com/أفضل-شركة-تنظيف-بنمره/
https://www.bareeq-clean.com/أفضل-شركة-تنظيف-بالعقيق/
https://www.bareeq-clean.com/أفضل-شركة-تنظيف-بالمندق/
https://www.bareeq-clean.com/أفضل-شركة-تنظيف-ببلجرشي/
https://www.bareeq-clean.com/أفضل-شركة-تنظيف-مفروشات-بالبخار-و-أثاث/
https://www.bareeq-clean.com/أفضل-شركة-تنظيف-بقلوة/
https://www.bareeq-clean.com/شركة-تنظيف-منازل-فلل-شقق-بالباحة/
https://www.bareeq-clean.com/أفضل-شركة-تنظيف-بالقرى/
https://www.bareeq-clean.com/أفضل-شركة-تنظيف-بالقطيف/
https://www.bareeq-clean.com/شركة-مكافحة-حشرات-رش-مبيدات-بالباحة/
https://www.bareeq-clean.com/أفضل-شركة-تنظيف-بالبشاير/
https://www.bareeq-clean.com/أفضل-شركة-تنظيف-في-بيده/
https://www.bareeq-clean.com/أفضل-شركة-تنظيف-بمعشوقة/
https://www.bareeq-clean.com/شركة-مكافحة-حشرات-رش-مبيدات-بالخبر/
https://www.bareeq-clean.com/شركة-مكافحة-حشرات-رش-مبيدات-بالخرج/
https://www.bareeq-clean.com/شركة-مكافحة-حشرات-رش-مبيدات-بالقطيف/
https://www.bareeq-clean.com/شركة-مكافحة-حشرات-رش-مبيدات-بنجران/
https://www.bareeq-clean.com/شركة-مكافحة-حشرات-رش-مبيدات-بجازان/
https://www.bareeq-clean.com/شركة-تنظيف-وتعقيم-خزانات-بالباحة/
https://www.bareeq-clean.com/شركة-تنظيف-منازل-بمكة-المكرمة/
https://www.bareeq-clean.com/شركة-تنظيف-خزانات-بمكة-المكرمة/
https://www.bareeq-clean.com/شركة-مكافحة-حشرات-رش-مبيدات-بمكة/
https://www.bareeq-clean.com/شركة-مكافحة-حشرات-رش-مبيدات-بأبها/
https://www.bareeq-clean.com/شركة-مكافحة-حشرات-رش-مبيدات-بالدمام/
https://www.bareeq-clean.com/شركة-مكافحة-حشرات-رش-مبيدات-بالمدينة/
https://www.bareeq-clean.com/شركة-تنظيف-خزانات-بالمدينة-المنورة/
https://www.bareeq-clean.com/شركة-تنظيف-منازل-بالمدينة/
https://www.bareeq-clean.com/شركة-تنظيف-خزانات-بالدمام/
https://www.bareeq-clean.com/شركة-تنظيف-خزانات-بأبها/
https://www.al-kauther.com/تنسيق-حدائق-بالرياض/
https://www.bareeq-clean.com/شركة-تنظيف-خزانات-بجازان/
https://www.bareeq-clean.com/شركة-تنظيف-خزانات-بنجران/
https://www.bareeq-clean.com/شركة-تنظيف-خزانات-بالخبر/
https://www.bareeq-clean.com/شركة-تنظيف-خزانات-بالخرج/
https://www.bareeq-clean.com/شركة-تنظيف-خزانات-بالقطيف/
https://www.bareeq-clean.com/شركة-تنظيف-خزانات-بالقطيف/
https://www.bareeq-clean.com/شركة-تنظيف-بالقطيف/
https://www.bareeq-clean.com/شركة-تنظيف-بالخرج/
https://www.bareeq-clean.com/شركة-تنظيف-بالخبر/
https://www.bareeq-clean.com/شركة-تنظيف-بنجران/
https://www.bareeq-clean.com/شركة-تنظيف-بجازان/
https://www.bareeq-clean.com/شركة-تنظيف-منازل-بالدمام/
https://www.bareeq-clean.com/اهم-الخدمات-التى-تقدمها-شركة-بريق-كليي/
https://www.bareeq-clean.com/صيانة-الخزانات-بالكويت-اصلاح-التانكي/
https://www.bareeq-clean.com/شركة-تنظيف-خزانات-فى-الكويت/
https://www.bareeq-clean.com/عزل-اسطح-جيتاروف-في-الكويت/
https://www.bareeq-clean.com/جهاز-تبريد-خزانات-الماء-الكويت/
https://www.bareeq-clean.com/تركيب-فلاتر-مركزية-الكويت/
https://www.bareeq-clean.com/صيانة-غسالات-بجدة/
https://www.bareeq-clean.com/صيانة-ثلاجات-بجدة/
https://www.bareeq-clean.com/فك-تركيب-تنظيف-صيانة-مكيفات-بالنعيرية/
https://www.bareeq-clean.com/شركة-تنظيف-كنب-بالبخار-بجدة/
https://www.bareeq-clean.com/شركة-تنظيف-بالبخار-بجدة-تنظيف-الفلل/
https://www.bareeq-clean.com/شركة-تنظيف-خزانات-بجدة-غسيل-تعقيم/
https://www.bareeq-clean.com/شركة-مكافحة-و-رش-حشرات-بجدة/
https://www.bareeq-clean.com/أفضل-شركة-تنظيف-بالباحة/
https://www.bareeq-clean.com/شركة-تنظيف-خزانات-بالباحة/
https://www.bareeq-clean.com/al-baha-cleanhouse-company/
https://www.bareeq-clean.com/صيانة-الخزانات-بالكويت-اصلاح-التانكي/
https://www.bareeq-clean.com/عزل-اسطح-جيتاروف-في-الكويت/
https://www.bareeq-clean.com/جهاز-تبريد-خزانات-الماء-الكويت/
https://www.bareeq-clean.com/تركيب-فلاتر-مركزية-الكويت/
https://www.bareeq-clean.com/شركة-تنظيف-بالبخار-بجدة-تنظيف-الفلل/
https://www.bareeq-clean.com/شركة-رش-مبيدات-و-مكافحة-حشرات-في-جدة/
https://www.bareeq-clean.com/أفضل-شركة-تنظيف-الخزانات-في-جدة/
https://www.bareeq-clean.com/شركة-تنظيف-خزانات-بجدة-غسيل-تعقيم/
https://www.bareeq-clean.com/شركة-تنظيف-مجالس-كنب-بالبخار-بجدة/
https://www.bareeq-clean.com/افضل-شركة-تنظيف-مساجد-بجدة/
https://www.bareeq-clean.com/أرخص-شركة-تنظيف-المنازل-بجدة/
https://www.bareeq-clean.com/شركة-رش-مبيدات-و-مكافحة-حشرات-بجدة/
https://www.bareeq-clean.com/شركة-مكافحة-و-رش-حشرات-بجدة/
https://www.bareeq-clean.com/شركة-تنظيف-مسابح-بجدة/
https://www.bareeq-clean.com/شركة-تنظيف-شقق-فلل-منازل-بجدة/
https://www.bareeq-clean.com/شركة-تنظيف-صيانة-تركيب-مكيفات-بجدة/
https://www.bareeq-clean.com/تركيب-تنظيف-صيانة-مكيفات-بحفر-الباطن/
https://www.bareeq-clean.com/شركة-تنظيف-بحفر-الباطن/
https://www.bareeq-clean.com/شركة-تنظيف-خزانات-بحفر-الباطن/
https://www.bareeq-clean.com/شركة-مكافحة-رش-حشرات-بحفر-الباطن/
https://www.bareeq-clean.com/شركة-تنظيف-صيانة-تركيب-مكيفات-بينبع/
https://www.bareeq-clean.com/شركة-تنظيف-منازل-بينبع/
https://www.bareeq-clean.com/شركة-تنظيف-خزانات-بينبع/
https://www.bareeq-clean.com/مكافحة-الحشرات-بينبع/
https://www.bareeq-clean.com/شركة-تنظيف-بالجبيل/
https://www.bareeq-clean.com/شركة-تنظيف-خزانات-بالجبيل/
https://www.bareeq-clean.com/شركة-مكافحة-حشرات-رش-مبيدات-بالجبيل/
https://www.bareeq-clean.com/khamis-mushait-cleaning-company-house/
https://www.bareeq-clean.com/شركة-تنظيف-صيانة-تركيب-مكيفات-بالجبيل/
https://www.bareeq-clean.com/تنظيف-صيانة-تركيب-مكيفات-بخميس-مشيط/
https://www.bareeq-clean.com/فك-تركيب-تنظيف-صيانة-مكيفات-بخميس-مشيط/
https://www.bareeq-clean.com/شركة-مكافحة-حشرات-بخميس-مشيط/
https://www.bareeq-clean.com/شركة-تنظيف-خزانات-بخميس-مشيط/
https://www.bareeq-clean.com/شركة-تنظيف-منازل-بأبها-خميس-مشيط/
https://www.bareeq-clean.com/شركة-تنظيف-المنازل-في-بيشة/
https://www.bareeq-clean.com/شركة-تنظيف-فى-المجاردة/
https://www.bareeq-clean.com/شركة-تنظيف-فى-ظهران-الجنوب/
https://www.bareeq-clean.com/شركة-تنظيف-فى-الدرب/
https://www.bareeq-clean.com/شركة-تنظيف-في-محايل-عسير
https://www.bareeq-clean.com/شركة-تنظيف-فى-النماص/
https://www.bareeq-clean.com/شركة-تنظيف-فى-احد-رفيده/
https://www.bareeq-clean.com/شركة-تنظيف-صيانة-تركيب-مكيفات-بأبها/
https://www.bareeq-clean.com/شركة-تنظيف-بتبوك-بالبخار/
https://www.bareeq-clean.com/أفضل-شركة-تنظيف-خزانات-بتبوك/
https://www.bareeq-clean.com/شركة-مكافحة-حشرات-و-رش-مبيدات-بتبوك/
https://www.bareeq-clean.com/شركة-تنظيف-صيانة-تركيب-مكيفات-بتبوك/
https://www.bareeq-clean.com/شركة-تنظيف-منازل-بالاحساء-بالدمام/
https://www.bareeq-clean.com/شركة-تنظيف-خزانات-بالاحساء/
https://www.bareeq-clean.com/شركة-مكافحة-حشرات-رش-مبيدات-بالإحساء/
https://www.bareeq-clean.com/شركة-تنظيف-صيانة-تركيب-مكيفات-بالإحسا/
https://tinyurl.com/2bd9pyef
https://tinyurl.com/2buukgko
https://tinyurl.com/2dhspzuk
https://tinyurl.com/27ghdvu5
https://tinyurl.com/2ypyeuks
https://tinyurl.com/25qxm6k8
https://tinyurl.com/27ttkst9
https://tinyurl.com/27a5sodw
https://tinyurl.com/2ybkfltm
https://tinyurl.com/2alznqqr
https://tinyurl.com/2c4efqd3
https://tinyurl.com/29uwlxm5
https://tinyurl.com/2a3wmunv
https://tinyurl.com/2xkgna5d
https://tinyurl.com/2dfu7znd
https://tinyurl.com/26ewn9w3
https://tinyurl.com/2ddzdt9o
https://tinyurl.com/2cvwdvo8
https://tinyurl.com/23jy4s9n
https://tinyurl.com/2ag8lhkr
https://tinyurl.com/22lasm4w
https://tinyurl.com/242gy8ea
https://tinyurl.com/2awz7sg8
https://tinyurl.com/2b9rp99t
https://tinyurl.com/26euuv7y
https://tinyurl.com/235ttz7s
https://tinyurl.com/2aamoflh
https://tinyurl.com/27bv7gfw
https://tinyurl.com/284ew3vr
https://tinyurl.com/2aayh6hq
https://tinyurl.com/2bdu5cxg
https://tinyurl.com/26qkekp8
https://tinyurl.com/22dnp2ac
https://tinyurl.com/23k59b7w
https://tinyurl.com/2bjqmzz5
https://tinyurl.com/26jav5gx
https://tinyurl.com/27cyp7x3
https://tinyurl.com/2yf6vhpo
https://tinyurl.com/2a8xalmg
https://tinyurl.com/2aro2q4q
https://tinyurl.com/25ahk74o
https://tinyurl.com/233lkjba
https://tinyurl.com/27×9cn3y
https://tinyurl.com/2y5c7s6s
https://tinyurl.com/267wngle
https://tinyurl.com/23ftfnld
https://tinyurl.com/2yao2g4u
https://tinyurl.com/285lhrre
https://tinyurl.com/26mpps85
https://tinyurl.com/2d6etcev
https://tinyurl.com/2ale2kmu
https://tinyurl.com/2xjka4dl
https://tinyurl.com/29fdn6rq
https://tinyurl.com/2dcxqee8
https://tinyurl.com/29bpew6m
https://tinyurl.com/2xqmo5ll
https://tinyurl.com/2y8msv9k
https://tinyurl.com/29y72pjo
https://tinyurl.com/28buehmh
https://tinyurl.com/2cfry7z7
https://tinyurl.com/262ydvbn
https://tinyurl.com/2y4ppus6
https://tinyurl.com/23ch28qj
https://tinyurl.com/29hnohgd
https://tinyurl.com/28l4jr9v
https://tinyurl.com/29rj437z
https://tinyurl.com/24pcq9sf
https://tinyurl.com/273sszw3
https://tinyurl.com/258wwp98
https://tinyurl.com/23bwcn6w
https://tinyurl.com/25429wdm
https://tinyurl.com/26rln9bm
https://tinyurl.com/25v2zj57
https://tinyurl.com/262cy2u2
https://tinyurl.com/2c3btcg4
https://tinyurl.com/2b6bjr76
https://tinyurl.com/22u8vt8b
https://tinyurl.com/27djr8a3
https://tinyurl.com/2bnukna2
https://tinyurl.com/2xwk4z2b
https://tinyurl.com/2a6zbof3
https://tinyurl.com/22pb93cp
https://tinyurl.com/2aczdlgt
https://tinyurl.com/2bvalt3e
https://tinyurl.com/2yxbthn6
https://tinyurl.com/2b4ad9bt
https://tinyurl.com/2dou34zr
https://tinyurl.com/2y6jxsq7
https://tinyurl.com/26jyt2vv
https://tinyurl.com/2ceralx3
https://tinyurl.com/22axh66e
https://tinyurl.com/2bc84xos
https://tinyurl.com/2cyhp8m2
https://tinyurl.com/232ybjro
https://tinyurl.com/2ccrtets
https://tinyurl.com/24xb2nb4
https://tinyurl.com/2ajtmfz6
https://tinyurl.com/235mjrfs
https://tinyurl.com/236hthkr
https://tinyurl.com/2yfhbckb
https://tinyurl.com/22aryhjb
https://tinyurl.com/26cth3kw
https://tinyurl.com/279tqltu
https://tinyurl.com/22bwvc9m
https://tinyurl.com/24oes22d
https://tinyurl.com/2bfgwp2z
https://tinyurl.com/23rezgqf
https://tinyurl.com/2ygualbu
https://tinyurl.com/238cxlet
https://tinyurl.com/24ulwd5e
https://tinyurl.com/22s3qyed
https://tinyurl.com/23l8ovxw
https://tinyurl.com/285eux7n
https://tinyurl.com/2c593kcq
https://tinyurl.com/2787zxuh
https://tinyurl.com/27qlsk5c
https://tinyurl.com/24l2xxq2
https://tinyurl.com/22vatexy
https://tinyurl.com/27wluh75
https://tinyurl.com/2cyod38q
https://tinyurl.com/25evnuxg
https://tinyurl.com/25j86dpb
https://tinyurl.com/26p8zrkf
https://tinyurl.com/23uqhc6p
https://tinyurl.com/2aeq8xvu
https://tinyurl.com/2yyrvuhc
https://tinyurl.com/23qo49g5
https://tinyurl.com/233ogdn5
https://tinyurl.com/2xnx55mw
https://tinyurl.com/27egenpk
https://tinyurl.com/2a77tptc
https://tinyurl.com/2d6kly5l
https://tinyurl.com/2c9kbftn
https://tinyurl.com/26zzh9mt
https://tinyurl.com/24ydx82r
https://tinyurl.com/2bdbqu8k
https://tinyurl.com/2bu2z36h
https://tinyurl.com/2c87c754
https://tinyurl.com/23muzwzs
https://tinyurl.com/23sggyz5
https://tinyurl.com/28mw5hzh
https://tinyurl.com/2697r9zb
https://tinyurl.com/2dfu7znd
https://tinyurl.com/227zkcn5
https://tinyurl.com/2akgzwbc
https://tinyurl.com/25foc2hc
https://tinyurl.com/24hekwxw
https://tinyurl.com/2dg8ywwh
https://tinyurl.com/2dkaf2n4
https://tinyurl.com/24z2s84n
https://tinyurl.com/2c6jebg9
https://tinyurl.com/2xkgna5d
https://tinyurl.com/26y97c9b
https://tinyurl.com/2atk6zem
https://tinyurl.com/2ysxqwww
https://tinyurl.com/29wqwe6w
https://tinyurl.com/22sy4gqa
https://tinyurl.com/24zkhqoa
https://tinyurl.com/29bhuvnu
https://tinyurl.com/269c85vg
https://tinyurl.com/2cosesev
https://tinyurl.com/2bcsxhzy
https://tinyurl.com/2cmgl6y9
https://tinyurl.com/23lzftna
https://tinyurl.com/224re6w2
https://tinyurl.com/2yp9kr8t
https://tinyurl.com/2325atqc
https://tinyurl.com/2awlwso4
https://tinyurl.com/2awlwso4
https://tinyurl.com/22rsreh4
https://tinyurl.com/277zezup
https://tinyurl.com/28z9ebk7
https://tinyurl.com/2akeqkja
https://tinyurl.com/2cvk8p4j
https://tinyurl.com/2yp2zd7l
https://tinyurl.com/23vvsw3n
https://tinyurl.com/26gzhsq8
https://tinyurl.com/27qlsk5c
https://tinyurl.com/2a8t5jks
https://tinyurl.com/27nl9drj
https://tinyurl.com/2xhzwv6f
https://tinyurl.com/23wk387e
https://tinyurl.com/29nzcnu4
https://tinyurl.com/2cqjc6rh
https://tinyurl.com/2ypyeuks
https://tinyurl.com/2buukgko
https://tinyurl.com/27ttkst9
https://tinyurl.com/2ybkfltm
https://tinyurl.com/29uwlxm5
https://tinyurl.com/2a3wmunv
https://tinyurl.com/24k5nr9f
https://tinyurl.com/26gzhsq8
https://tinyurl.com/27qlsk5c
https://tinyurl.com/2a8t5jks
https://tinyurl.com/27nl9drj
https://tinyurl.com/2xhzwv6f
https://tinyurl.com/2buukgko
https://tinyurl.com/22hsfoje
https://tinyurl.com/27a5sodw
https://tinyurl.com/27ttkst9
https://tinyurl.com/27ghdvu5
https://tinyurl.com/2c4efqd3
https://tinyurl.com/25qxm6k8
https://tinyurl.com/2alznqqr
https://tinyurl.com/2ybkfltm
https://tinyurl.com/268mjg5b
https://tinyurl.com/2dhspzuk
https://tinyurl.com/2do63mf4
https://tinyurl.com/28892lmh
https://tinyurl.com/2cstdhg4
https://tinyurl.com/2b3uxvqz
https://tinyurl.com/2d874g52
https://tinyurl.com/28lf3age
https://tinyurl.com/2ym85f22
https://tinyurl.com/269sgasm
https://tinyurl.com/24bzenzv
https://tinyurl.com/2bf8ugqd
https://tinyurl.com/2897u2bk
https://tinyurl.com/24yzl8el
https://tinyurl.com/28ttkejw
https://tinyurl.com/23xnyygb
https://tinyurl.com/22sz8rjh
https://tinyurl.com/26exhv7c
https://tinyurl.com/27fvh9bt
https://tinyurl.com/29q8mnp6
https://tinyurl.com/25fgodmo
https://tinyurl.com/248hhj5h
https://tinyurl.com/2dpb4b9e
https://tinyurl.com/2749xjqm
https://tinyurl.com/28hpvtw9
https://tinyurl.com/23efgklu
https://tinyurl.com/23rhwzvn
https://tinyurl.com/28fa5ujw
https://tinyurl.com/26o2zbz8
https://tinyurl.com/2yrpoonr
https://tinyurl.com/267klvdl
https://tinyurl.com/2yqxcwlr
https://tinyurl.com/2ae34oo8
https://tinyurl.com/2dxkffow
https://tinyurl.com/2y7bwwco
https://tinyurl.com/24w8fs4s
https://tinyurl.com/2725k3oq
https://is.gd/vKCwMB
https://is.gd/swwHbn
https://is.gd/e7sGke
https://is.gd/dQY0dN
https://is.gd/mavB0q
https://is.gd/X6BOQ5
https://is.gd/z0T6Fz
https://is.gd/pWc710
https://is.gd/dOLyky
https://is.gd/RaQqCZ
https://is.gd/QUVZvQ
https://is.gd/awP1pN
https://is.gd/LgP696
https://is.gd/uJUa8h
https://is.gd/MjaBjM
https://is.gd/nTLX3l
https://is.gd/otEgUT
https://is.gd/GsIjxV
https://is.gd/lDBwrd
https://is.gd/75TRhy
https://is.gd/DwnI1R
https://is.gd/4I1pv2
https://is.gd/XW1Uyh
https://is.gd/SRGGsi
https://is.gd/e0rAEb
https://is.gd/DxCaqO
https://is.gd/iTrBHY
https://is.gd/ZpsmaH
https://is.gd/qzOQUk
https://is.gd/qTtTGl
https://is.gd/P67FwI
https://is.gd/8NWodG
https://is.gd/iRJchf
https://is.gd/F4zEiL
https://is.gd/bvqhvM
https://is.gd/wDVscd
https://is.gd/CXBd55
https://is.gd/3pjszM
https://is.gd/CxR1J1
https://is.gd/RtyHE8
https://is.gd/yFQVR4
https://is.gd/aFiOxz
https://is.gd/0fEhf6
https://is.gd/4KsO0D
https://is.gd/J7EMa6
https://is.gd/tpoyZA
https://is.gd/XhCbkC
https://is.gd/BLy6DP
https://is.gd/zUTs0G
https://is.gd/kDrxj3
https://is.gd/N62nJ7
https://is.gd/iRC1vq
https://is.gd/CwCo5H
https://is.gd/JzG1UP
https://is.gd/sYpTUn
https://is.gd/Nv5Jol
https://is.gd/ZdHhMy
https://is.gd/EENU57
https://is.gd/aGZHxi
https://is.gd/mLbBrS
https://is.gd/Z1hZPI
https://is.gd/LKzkQ4
https://is.gd/5DGYKC
https://is.gd/lC8Zoa
https://is.gd/9GzTxK
https://is.gd/rNRriR
https://is.gd/VXXA6f
https://is.gd/Wn4eyn
https://is.gd/khtw1P
https://is.gd/0nPrWI
https://is.gd/AIE1S5
https://is.gd/7tF0V0
https://is.gd/doxWVP
https://is.gd/fbUWMy
https://is.gd/JLN5wt
https://is.gd/8iSWER
https://is.gd/sYWSW9
https://is.gd/qKStDx
https://is.gd/8Govpy
https://is.gd/GBXVT8
https://is.gd/v60wOV
https://is.gd/H3RyzX
https://is.gd/HyqhWV
https://is.gd/Cgni44
https://is.gd/B0HnKu
https://is.gd/wjtogM
https://is.gd/wOeT7t
https://is.gd/65jPl7
https://is.gd/OOyjz8
https://is.gd/QZFZEO
https://is.gd/li05II
https://is.gd/ML1avk
https://is.gd/T0DQRB
https://is.gd/rDMlTe
https://is.gd/vfnl9R
https://is.gd/Gdggy0
https://is.gd/RWD6BG
https://is.gd/QVL8mO
https://is.gd/Jqit9S
https://is.gd/RkmAW1
https://is.gd/mFX7uU
https://is.gd/MCUTQQ
https://is.gd/oe2uFB
https://is.gd/08WluB
https://is.gd/jA9SHe
https://is.gd/urup5k
https://is.gd/M0M6M3
https://is.gd/GOg37w
https://is.gd/BiYSVb
https://is.gd/ZsTQ3T
https://is.gd/xnR87N
https://is.gd/vElgwb
https://is.gd/eczUft
https://is.gd/VZo8XU
https://is.gd/AVS9xt
https://is.gd/FgR6Uw
https://is.gd/kdpCzu
https://is.gd/qowKO7
https://is.gd/ehaxvs
https://is.gd/aa8T6b
https://is.gd/OR3HGh
https://is.gd/bS7sdB
https://is.gd/pY6puU
https://is.gd/FOqi9l
https://is.gd/lFszEz
https://is.gd/LO0UPe
https://is.gd/ri6XAd
https://is.gd/F7Fh4I
https://is.gd/sAdXpM
https://is.gd/XXV8ds
https://is.gd/fdR4hY
https://is.gd/ofKaPh
https://is.gd/I5uiPO
https://is.gd/6PBfNS
https://is.gd/csIWHZ
https://is.gd/riqRCW
https://is.gd/HAD0EH
https://is.gd/oGNIac
https://is.gd/sxyjeG
https://is.gd/lKjo07
https://is.gd/WQWxjs
https://is.gd/FLfm1P
https://is.gd/MjaBjM
https://is.gd/8oXqY9
https://is.gd/3JGXdg
https://is.gd/OnP8Yr
https://is.gd/ditaak
https://is.gd/uTKiLv
https://is.gd/4n1mXc
https://is.gd/qjMa4j
https://is.gd/Tiougi
https://is.gd/uJUa8h
https://is.gd/PU0ueJ
https://is.gd/NaDLD4
https://is.gd/txA5O3
https://is.gd/3kp8Ly
https://is.gd/gQCzgC
https://is.gd/qZKQq9
https://is.gd/eWB7sP
https://is.gd/vKyTFu
https://is.gd/okYPZV
https://is.gd/k4d5rZ
https://is.gd/e4tPlO
https://is.gd/rbr8Lq
https://is.gd/TgHcBu
https://is.gd/RuLfkT
https://is.gd/VFjYFb
https://is.gd/4rXTYA
https://is.gd/4rXTYA
https://is.gd/aqeCzy
https://is.gd/EU0FPm
https://is.gd/fi7yoH
https://is.gd/eTn1oK
https://is.gd/aXM8Ji
https://is.gd/6QP90k
https://is.gd/OhBo6W
https://is.gd/XgcRJN
https://is.gd/FgR6Uw
https://is.gd/94AaZ8
https://is.gd/bOxePC
https://is.gd/jTjop4
https://is.gd/YmMKSE
https://is.gd/6GWdCl
https://is.gd/9dB333
https://is.gd/mavB0q
https://is.gd/swwHbn
https://is.gd/z0T6Fz
https://is.gd/dOLyky
https://is.gd/awP1pN
https://is.gd/LgP696
https://is.gd/nTwqTb
https://is.gd/XgcRJN
https://is.gd/FgR6Uw
https://is.gd/94AaZ8
https://is.gd/bOxePC
https://is.gd/jTjop4
https://is.gd/swwHbn
https://is.gd/yZuVPn
https://is.gd/pWc710
https://is.gd/z0T6Fz
https://is.gd/dQY0dN
https://is.gd/QUVZvQ
https://is.gd/X6BOQ5
https://is.gd/RaQqCZ
https://is.gd/dOLyky
https://is.gd/hV3Vd8
https://is.gd/e7sGke
https://is.gd/Uag7fo
https://is.gd/ZmCm2a
https://is.gd/0lxVqv
https://is.gd/X2YpWZ
https://is.gd/wWrPLK
https://is.gd/D3Zehy
https://is.gd/tPxfbR
https://is.gd/AEDOU4
https://is.gd/dTscj5
https://is.gd/mZPwE2
https://is.gd/QGldvl
https://is.gd/Kc1onC
https://is.gd/EEw51F
https://is.gd/zAfbSt
https://is.gd/B4LPiz
https://is.gd/zVImU2
https://is.gd/CWjz3E
https://is.gd/3oY4nZ
https://is.gd/41wOFp
https://is.gd/qtZzea
https://is.gd/F3rKw0
https://is.gd/ER57K4
https://is.gd/Wh0Oc4
https://is.gd/0Pe6n3
https://is.gd/YOd6Sx
https://is.gd/SsLLcm
https://is.gd/zWmA8s
https://is.gd/l6slno
https://is.gd/D8xFkE
https://is.gd/koBCzp
https://is.gd/S77ZQ4
https://is.gd/eTFoww
https://is.gd/QdaUZf
https://is.gd/OXD7sj
https://is.gd/lSzLRD
https://v.gd/LsQ5l1
https://v.gd/TfF1sj
https://v.gd/hvOsxG
https://v.gd/MXqw9a
https://v.gd/xuGie7
https://v.gd/szCgKO
https://v.gd/Yv8AOB
https://v.gd/Ypeiea
https://v.gd/i6eGlg
https://v.gd/rDwhvc
https://v.gd/WosXqz
https://v.gd/n28Cig
https://v.gd/LeEcOp
https://v.gd/U7tqX4
https://v.gd/9y0AFg
https://v.gd/8k4nAp
https://v.gd/qxNrVF
https://v.gd/aXEEv2
https://v.gd/yBPcPM
https://v.gd/TBc29Q
https://v.gd/PRPSSP
https://v.gd/hxtFf1
https://v.gd/drpO4G
https://v.gd/3XckKz
https://v.gd/7qh2GE
https://v.gd/sQbkB5
https://v.gd/L5uVRo
https://v.gd/q7uqqo
https://v.gd/fcIM0m
https://v.gd/V0MqfQ
https://v.gd/od5ouO
https://v.gd/lJg97V
https://v.gd/62KyTi
https://v.gd/dxn4gd
https://v.gd/XDck1G
https://v.gd/6oB58O
https://v.gd/Vo91OS
https://v.gd/RLsh3s
https://v.gd/sINUav
https://v.gd/1qDL5Z
https://v.gd/TTjunA
https://v.gd/bGeicF
https://v.gd/CvqB2a
https://v.gd/BxJFsC
https://v.gd/96CP7c
https://v.gd/zLlK44
https://v.gd/ANsCoM
https://v.gd/F9A1F5
https://v.gd/2pDxLQ
https://v.gd/TSMQqj
https://v.gd/A0kBpz
https://v.gd/RMgEWk
https://v.gd/TujfHP
https://v.gd/oV79AA
https://v.gd/HK9tX0
https://v.gd/vUQI8B
https://v.gd/zefDoC
https://v.gd/n1qeyr
https://v.gd/wB666P
https://v.gd/QbJRq1
https://v.gd/zClDCC
https://v.gd/826dhC
https://v.gd/i8jXzM
https://v.gd/uf0LG9
https://v.gd/TXfMrp
https://v.gd/iojI0j
https://v.gd/BA354V
https://v.gd/WhGcaT
https://v.gd/qa5FEy
https://v.gd/rCUAIb
https://v.gd/zCzFEf
https://v.gd/ueDLg4
https://v.gd/LksfKc
https://v.gd/y9yXX2
https://v.gd/lQAuKf
https://v.gd/YRNCLA
https://v.gd/Gzz6ey
https://v.gd/FK3WYe
https://v.gd/yyw7G8
https://v.gd/yqUnWA
https://v.gd/0EFgdr
https://v.gd/cA4azB
https://v.gd/qJlTA2
https://v.gd/Y7NHpw
https://v.gd/2oPjYj
https://v.gd/jthl38
https://v.gd/7HrlrP
https://v.gd/3z9EiK
https://v.gd/MfDU4B
https://v.gd/Kqw0Ul
https://v.gd/xzJd51
https://v.gd/esaR5I
https://v.gd/sNwwLD
https://v.gd/jSeW99
https://v.gd/joWGZl
https://v.gd/SqMxII
https://v.gd/GLdEdW
https://v.gd/RNWNvp
https://v.gd/11KDne
https://v.gd/GTif7E
https://v.gd/wyLVy9
https://v.gd/Z5deGm
https://v.gd/eJG5sB
https://v.gd/og02vM
https://v.gd/Pz8zOF
https://v.gd/lgw2OO
https://v.gd/xRS7IF
https://v.gd/3c4w0a
https://v.gd/ye3xud
https://v.gd/a1t6Ti
https://v.gd/NlZrGZ
https://v.gd/Mvuyi4
https://v.gd/4iCoYV
https://v.gd/D8C0K9
https://v.gd/jOdPty
https://v.gd/Yw4qzk
https://v.gd/44RCOO
https://v.gd/ONWpVj
https://v.gd/pEApvz
https://v.gd/fe5pXL
https://v.gd/Res00V
https://v.gd/RP85OK
https://v.gd/2pUP7z
https://v.gd/drxWNA
https://v.gd/C1pHLf
https://v.gd/SBE98O
https://v.gd/sOouY5
https://v.gd/nvaz1d
https://v.gd/HHv3th
https://v.gd/OP2BBY
https://v.gd/W4dnac
https://v.gd/JQ0vTk
https://v.gd/pbQZ0r
https://v.gd/S9IuaK
https://v.gd/CvNA2Y
https://v.gd/3IzRiS
https://v.gd/U8oGYb
https://v.gd/lQZ0Kr
https://v.gd/iS4FVP
https://v.gd/hX8Zch
https://v.gd/Pt9uAG
https://v.gd/AqxazH
https://v.gd/9y0AFg
https://v.gd/Z20gXb
https://v.gd/H63aEa
https://v.gd/PmvvLs
https://v.gd/A2FwAk
https://v.gd/UEFtlw
https://v.gd/MP9MYU
https://v.gd/CoItHF
https://v.gd/HiP6hB
https://v.gd/U7tqX4
https://v.gd/tMZTl3
https://v.gd/oD231b
https://v.gd/X2RKZJ
https://v.gd/V9DEB8
https://v.gd/g792si
https://v.gd/IFR4Yd
https://v.gd/vTqIen
https://v.gd/Lrlsen
https://v.gd/UpyxfN
https://v.gd/W1fS8u
https://v.gd/ZASSvk
https://v.gd/XObHkj
https://v.gd/DYuEvg
https://v.gd/Kwz94L
https://v.gd/jqclWG
https://v.gd/GetklD
https://v.gd/GetklD
https://v.gd/74GjoD
https://v.gd/ZIKOoz
https://v.gd/rBh5R9
https://v.gd/aM4cOz
https://v.gd/HXEliQ
https://v.gd/B3g4fc
https://v.gd/L9eKXU
https://v.gd/3eHoOO
https://v.gd/Yw4qzk
https://v.gd/HZzc4Q
https://v.gd/9k6RNE
https://v.gd/KjtCBu
https://v.gd/b4P5Bn
https://v.gd/gQ1BUX
https://v.gd/Bpn6FZ
https://v.gd/xuGie7
https://v.gd/TfF1sj
https://v.gd/Yv8AOB
https://v.gd/i6eGlg
https://v.gd/n28Cig
https://v.gd/LeEcOp
https://v.gd/IBtfqP
https://v.gd/3eHoOO
https://v.gd/Yw4qzk
https://v.gd/HZzc4Q
https://v.gd/9k6RNE
https://v.gd/KjtCBu
https://v.gd/TfF1sj
https://v.gd/VBplWj
https://v.gd/Ypeiea
https://v.gd/Yv8AOB
https://v.gd/MXqw9a
https://v.gd/WosXqz
https://v.gd/szCgKO
https://v.gd/rDwhvc
https://v.gd/i6eGlg
https://v.gd/pCMEoo
https://v.gd/hvOsxG
https://v.gd/moiE2B
https://v.gd/w4MzJZ
https://v.gd/FPoHDJ
https://v.gd/feUMAs
https://v.gd/SPlqt4
https://v.gd/fwPf3w
https://v.gd/MK69P1
https://v.gd/7z5JLp
https://v.gd/OAbSpi
https://v.gd/Q2uOys
https://v.gd/vnU6yk
https://v.gd/fzP0XK
https://v.gd/1nqrqp
https://v.gd/cFOMbt
https://v.gd/4TV114
https://v.gd/E42gE5
https://v.gd/cmKdC7
https://v.gd/PcPUhW
https://v.gd/co4Xot
https://v.gd/HYZBTC
https://v.gd/cgCr3f
https://v.gd/HhDHJr
https://v.gd/wzMTnJ
https://v.gd/qVF0jJ
https://v.gd/nfRw9t
https://v.gd/an75hi
https://v.gd/B97MrN
https://v.gd/8V0hui
https://v.gd/8PLTyR
https://v.gd/Qk95Ze
https://v.gd/klck5q
https://v.gd/lJ9uth
https://v.gd/FvSxm2
https://v.gd/bjE7vO
https://clck.ru/3PUTsk
https://clck.ru/3PUTst
https://clck.ru/3PUTt2
https://clck.ru/3PUTtG
https://clck.ru/3PUTtL
https://clck.ru/3PUTtS
https://clck.ru/3PUTtY
https://clck.ru/3PUTte
https://clck.ru/3PUTto
https://clck.ru/3PUTtr
https://clck.ru/3PUTtv
https://clck.ru/3PUTu2
https://clck.ru/3PUTuE
https://clck.ru/3PUTuR
https://clck.ru/3PUTuW
https://clck.ru/3PUTuh
https://clck.ru/3PUTum
https://clck.ru/3PUTur
https://clck.ru/3PUTuy
https://clck.ru/3PUTv5
https://clck.ru/3PUTv8
https://clck.ru/3PUTvB
https://clck.ru/3PUTvE
https://clck.ru/3PUTvK
https://clck.ru/3PUTvP
https://clck.ru/3PUTvS
https://clck.ru/3PUTve
https://clck.ru/3PUTvq
https://clck.ru/3PUTwH
https://clck.ru/3PUTwR
https://clck.ru/3PUTwt
https://clck.ru/3PUTwz
https://clck.ru/3PUTx4
https://clck.ru/3PUTx7
https://clck.ru/3PUTxA
https://clck.ru/3PUTxF
https://clck.ru/3PUTxQ
https://clck.ru/3PUTxU
https://clck.ru/3PUTxW
https://clck.ru/3PUTxf
https://clck.ru/3PUTxs
https://clck.ru/3PUTy2
https://clck.ru/3PUTy7
https://clck.ru/3PUTyL
https://clck.ru/3PUTyU
https://clck.ru/3PUTyf
https://clck.ru/3PUTym
https://clck.ru/3PUTyr
https://clck.ru/3PUTyv
https://clck.ru/3PUTyy
https://clck.ru/3PUTz7
https://clck.ru/3PUTzD
https://clck.ru/3PUTzM
https://clck.ru/3PUTzV
https://clck.ru/3PUTzb
https://clck.ru/3PUTzc
https://clck.ru/3PUTzi
https://clck.ru/3PUTzk
https://clck.ru/3PUTzt
https://clck.ru/3PUTzz
https://clck.ru/3PUU25
https://clck.ru/3PUU2D
https://clck.ru/3PUU2Q
https://clck.ru/3PUU2V
https://clck.ru/3PUU2d
https://clck.ru/3PUU2h
https://clck.ru/3PUU2m
https://clck.ru/3PUU2v
https://clck.ru/3PUU33
https://clck.ru/3PUU3A
https://clck.ru/3PUU3G
https://clck.ru/3PUU3Q
https://clck.ru/3PUU3d
https://clck.ru/3PUU3i
https://clck.ru/3PUU3k
https://clck.ru/3PUU3q
https://clck.ru/3PUU3t
https://clck.ru/3PUU3z
https://clck.ru/3PUU4W
https://clck.ru/3PUU4t
https://clck.ru/3PUU4w
https://clck.ru/3PUU57
https://clck.ru/3PUU5D
https://clck.ru/3PUU5J
https://clck.ru/3PUU5P
https://clck.ru/3PUU5a
https://clck.ru/3PUU5h
https://clck.ru/3PUU5m
https://clck.ru/3PUU5r
https://clck.ru/3PUU5u
https://clck.ru/3PUU63
https://clck.ru/3PUU6A
https://clck.ru/3PUU6C
https://clck.ru/3PUU6F
https://clck.ru/3PUU6M
https://clck.ru/3PUU6T
https://clck.ru/3PUU6W
https://clck.ru/3PUU6f
https://clck.ru/3PUU6h
https://clck.ru/3PUU6r
https://clck.ru/3PUU6y
https://clck.ru/3PUU76
https://clck.ru/3PUU7E
https://clck.ru/3PUU7L
https://clck.ru/3PUU7N
https://clck.ru/3PUU7R
https://clck.ru/3PUU7X
https://clck.ru/3PUU7i
https://clck.ru/3PUU7v
https://clck.ru/3PUU85
https://clck.ru/3PUU8J
https://clck.ru/3PUU8c
https://clck.ru/3PUU8t
https://clck.ru/3PUU95
https://clck.ru/3PUU98
https://clck.ru/3PUU9E
https://clck.ru/3PUU9H
https://clck.ru/3PUU9T
https://clck.ru/3PUU9Z
https://clck.ru/3PUU9f
https://clck.ru/3PUU9j
https://clck.ru/3PUU9n
https://clck.ru/3PUU9t
https://clck.ru/3PUUA2
https://clck.ru/3PUUA9
https://clck.ru/3PUUAE
https://clck.ru/3PUUAR
https://clck.ru/3PUUAb
https://clck.ru/3PUUAg
https://clck.ru/3PUUAj
https://clck.ru/3PUUAr
https://clck.ru/3PUUAs
https://clck.ru/3PUUAx
https://clck.ru/3PUUBE
https://clck.ru/3PUUBN
https://clck.ru/3PUUBR
https://clck.ru/3PUUBX
https://clck.ru/3PUUBe
https://clck.ru/3PUUBm
https://clck.ru/3PUUBp
https://clck.ru/3PUUBx
https://clck.ru/3PUTuR
https://clck.ru/3PUUC2
https://clck.ru/3PUUC4
https://clck.ru/3PUUC6
https://clck.ru/3PUUC9
https://clck.ru/3PUUCA
https://clck.ru/3PUUCE
https://clck.ru/3PUUCR
https://clck.ru/3PUUCb
https://clck.ru/3PUTuE
https://clck.ru/3PUUCq
https://clck.ru/3PUUCw
https://clck.ru/3PUUD9
https://clck.ru/3PUUDD
https://clck.ru/3PUUDH
https://clck.ru/3PUUDN
https://clck.ru/3PUUDa
https://clck.ru/3PUUDe
https://clck.ru/3PUUDi
https://clck.ru/3PUUDn
https://clck.ru/3PUUDv
https://clck.ru/3PUUE4
https://clck.ru/3PUUE5
https://clck.ru/3PUUEF
https://clck.ru/3PUUEM
https://clck.ru/3PUUEb
https://clck.ru/3PUUEb
https://clck.ru/3PUUEs
https://clck.ru/3PUUEu
https://clck.ru/3PUUEz
https://clck.ru/3PUUF5
https://clck.ru/3PUUFB
https://clck.ru/3PUUFE
https://clck.ru/3PUUFZ
https://clck.ru/3PUUFi
https://clck.ru/3PUU98
https://clck.ru/3PUUFm
https://clck.ru/3PUUFu
https://clck.ru/3PUUFy
https://clck.ru/3PUUG5
https://clck.ru/3PUUGJ
https://clck.ru/3PUUGc
https://clck.ru/3PUTtG
https://clck.ru/3PUTsk
https://clck.ru/3PUTtS
https://clck.ru/3PUTte
https://clck.ru/3PUTtv
https://clck.ru/3PUTu2
https://clck.ru/3PLBmV
https://clck.ru/3PUUFi
https://clck.ru/3PUU98
https://clck.ru/3PUUFm
https://clck.ru/3PUUFu
https://clck.ru/3PUUFy
https://clck.ru/3PUTsk
https://clck.ru/3PUUHf
https://clck.ru/3PUTtY
https://clck.ru/3PUTtS
https://clck.ru/3PUTt2
https://clck.ru/3PUTtr
https://clck.ru/3PUTtL
https://clck.ru/3PUTto
https://clck.ru/3PUTte
https://clck.ru/3PUUJ9
https://clck.ru/3PUTst
https://clck.ru/3PUUJE
https://clck.ru/3PUUJP
https://clck.ru/3PUUJR
https://clck.ru/3PUUJU
https://clck.ru/3PUUJV
https://clck.ru/3PUUJY
https://clck.ru/3PUUJi
https://clck.ru/3PUUJq
https://clck.ru/3PUUK7
https://clck.ru/3PUUKL
https://clck.ru/3PUUKY
https://clck.ru/3PUUKh
https://clck.ru/3PUUKn
https://clck.ru/3PUUKt
https://clck.ru/3PUUKx
https://clck.ru/3PUUL4
https://clck.ru/3PUULD
https://clck.ru/3PUULR
https://clck.ru/3PUULe
https://clck.ru/3PUULk
https://clck.ru/3PUULr
https://clck.ru/3PUUM9
https://clck.ru/3PUUMZ
https://clck.ru/3PUUMs
https://clck.ru/3PUUNe
https://clck.ru/3PUUPb
https://clck.ru/3PUUQ7
https://clck.ru/3PUUQR
https://clck.ru/3PUUR9
https://clck.ru/3PUURD
https://clck.ru/3PUURQ
https://clck.ru/3PUURb
https://clck.ru/3PUURi
https://clck.ru/3PUURv
https://clck.ru/3PUURw
https://da.gd/fcB8O
https://da.gd/ao5Bg
https://da.gd/Eqjr80
https://da.gd/OAMIA
https://da.gd/TApEav
https://da.gd/I61p
https://da.gd/RPaQfP
https://da.gd/2zVnI
https://da.gd/qNA0UI
https://da.gd/g1HL
https://da.gd/5ZNBE
https://da.gd/7rp6y
https://da.gd/YlYYf
https://da.gd/7aJE58
https://da.gd/HFS4g
https://da.gd/eOwuSk
https://da.gd/ZaIRX
https://da.gd/kGhCNY
https://da.gd/5TqZkh
https://da.gd/NAqgz
https://da.gd/2cxnqa
https://da.gd/hm0sh
https://da.gd/HLujv
https://da.gd/fbGmR
https://da.gd/FzjWx
https://da.gd/XJOfO
https://da.gd/tEiXMF
https://da.gd/cjUZMR
https://da.gd/UWTnT
https://da.gd/WFddH
https://da.gd/QmQBty
https://da.gd/07AZT
https://da.gd/CL26ih
https://da.gd/Bmsu
https://da.gd/8DoYG
https://da.gd/ulm7L
https://da.gd/7CtG
https://da.gd/oPnTQ
https://da.gd/gDoUrz
https://da.gd/aOw5wF
https://da.gd/lJnTt
https://da.gd/nj4pD
https://da.gd/C34el
https://da.gd/SipCY8
https://da.gd/zInD
https://da.gd/kyh2Ae
https://da.gd/gWjdd
https://da.gd/nC9Xn
https://da.gd/GWPyQ0
https://da.gd/SycNu
https://da.gd/xveIP
https://da.gd/h0xY6S
https://da.gd/PDS0
https://da.gd/oUkLM
https://da.gd/fJsIA9
https://da.gd/FoXkFU
https://da.gd/nHVLp
https://da.gd/kQ2td
https://da.gd/0fOhAJ
https://da.gd/l321Ck
https://da.gd/npHid
https://da.gd/KZ2FoR
https://da.gd/L2zCX
https://da.gd/5AUIbU
https://da.gd/z08eK
https://da.gd/Be6as
https://da.gd/B5VkkJ
https://da.gd/QhuF6v
https://da.gd/8cjj8
https://da.gd/XnBzJ
https://da.gd/j3lYyC
https://da.gd/bxZmD
https://da.gd/p14d5P
https://da.gd/qZz1
https://da.gd/zCHCb
https://da.gd/NPflaF
https://da.gd/WFpwE
https://da.gd/YyTmk
https://da.gd/C9s7YP
https://da.gd/U6dbZ
https://da.gd/R4sw
https://da.gd/8BVMR
https://da.gd/Wqf0t
https://da.gd/o19m
https://da.gd/WnRKzf
https://da.gd/NTiX4
https://da.gd/Pa82G
https://da.gd/VQ3hAU
https://da.gd/XoTLx1
https://da.gd/k4dDwg
https://da.gd/2fhrTe
https://da.gd/M9yO
https://da.gd/hfP5b
https://da.gd/qetbKx
https://da.gd/jmIGa
https://da.gd/0ZO49k
https://da.gd/qI8Ij3
https://da.gd/1pCXpV
https://da.gd/OqRo6m
https://da.gd/UryA
https://da.gd/kEpS5C
https://da.gd/rqHGn
https://da.gd/eDp6u
https://da.gd/5C8fGP
https://da.gd/7sgo3
https://da.gd/rGLt
https://da.gd/oAKVB
https://da.gd/38DqV
https://da.gd/rtPdqs
https://da.gd/5Ia04J
https://da.gd/7As27Z
https://da.gd/FgxU1Q
https://da.gd/baLFkl
https://da.gd/CR2v0i
https://da.gd/5DUNAE
https://da.gd/k0dVd
https://da.gd/xBHbx
https://da.gd/OJnL2
https://da.gd/Lt0E1
https://da.gd/gqO0Ob
https://da.gd/92xJ2
https://da.gd/yqklJB
https://da.gd/GiVgd
https://da.gd/UNdpn
https://da.gd/nG75Ao
https://da.gd/Y5Jj4X
https://da.gd/ULlq1t
https://da.gd/0Ouf
https://da.gd/tXY3dH
https://da.gd/QYUpcz
https://da.gd/wN1CXp
https://da.gd/hBugph
https://da.gd/o2jRa
https://da.gd/iddnw
https://da.gd/wDTv
https://da.gd/UPr5mj
https://da.gd/Dmi9
https://da.gd/gnMu3Y
https://da.gd/ixMuW6
https://da.gd/nHFhgz
https://da.gd/Dxs4K
https://da.gd/j8SnQE
https://da.gd/HFS4g
https://da.gd/ZA262D
https://da.gd/4hs1a
https://da.gd/T3NVJf
https://da.gd/wmk3
https://da.gd/oS94K
https://da.gd/uLOsfm
https://da.gd/fuH7e
https://da.gd/ktt8B
https://da.gd/7aJE58
https://da.gd/MGgB
https://da.gd/11aRM
https://da.gd/JlWLc
https://da.gd/0tHSC
https://da.gd/gyF1
https://da.gd/ZHRo
https://da.gd/kuD4t2
https://da.gd/uRUDG
https://da.gd/56f13
https://da.gd/4RPfk
https://da.gd/mlzQu
https://da.gd/VQnmN
https://da.gd/ePpE
https://da.gd/f034B1
https://da.gd/0ZOzC
https://da.gd/CazNiB
https://da.gd/CazNiB
https://da.gd/0E8M70
https://da.gd/R322z7
https://da.gd/6Xj3r4
https://da.gd/mSfC5d
https://da.gd/eRdHKv
https://da.gd/BZOIac
https://da.gd/GbhKN
https://da.gd/GZvkT2
https://da.gd/k0dVd
https://da.gd/JbwFj
https://da.gd/EgS1JE
https://da.gd/cnNfw
https://da.gd/BpM5R
https://da.gd/QNc7b
https://da.gd/6Kkn1d
https://da.gd/TApEav
https://da.gd/ao5Bg
https://da.gd/RPaQfP
https://da.gd/qNA0UI
https://da.gd/7rp6y
https://da.gd/YlYYf
https://da.gd/I0P6zq
https://da.gd/GZvkT2
https://da.gd/k0dVd
https://da.gd/JbwFj
https://da.gd/EgS1JE
https://da.gd/cnNfw
https://da.gd/ao5Bg
https://da.gd/ACslz
https://da.gd/2zVnI
https://da.gd/RPaQfP
https://da.gd/OAMIA
https://da.gd/5ZNBE
https://da.gd/I61p
https://da.gd/g1HL
https://da.gd/qNA0UI
https://da.gd/pVTM
https://da.gd/Eqjr80
https://da.gd/4S76f
https://da.gd/hgWofn
https://da.gd/C4gOve
https://da.gd/o1HFG
https://da.gd/1a9At
https://da.gd/QTt6
https://da.gd/AdNX
https://da.gd/Hm10ye
https://da.gd/Iwy7VC
https://da.gd/H1Ga
https://da.gd/hWkA3
https://da.gd/idReQ
https://da.gd/Mzxd
https://da.gd/Qj7HG
https://da.gd/jYfjn
https://da.gd/QYlQmx
https://da.gd/xRNUYh
https://da.gd/yCYAqe
https://da.gd/0Doy3
https://da.gd/yajZav
https://da.gd/Mxa9Me
https://da.gd/H8xsXo
https://da.gd/VUlkm1
https://da.gd/IL7O6Z
https://da.gd/UmPoqq
https://da.gd/Yhvls4
https://da.gd/KaJ49
https://da.gd/aKMe7
https://da.gd/AaYHPP
https://da.gd/LGklGA
https://da.gd/I9Z0J
https://da.gd/dKMfb
https://da.gd/YO98SH
https://da.gd/1CYNI
https://da.gd/7WyNlb
https://ulvis.net/y7kQ
https://ulvis.net/J13I
https://ulvis.net/zy8p
https://ulvis.net/3KS5
https://ulvis.net/Emqx
https://nz.sa/SviIi
https://nz.sa/WicIy
https://nz.sa/WCBWC
https://nz.sa/JYBHj
https://nz.sa/SsXsw
https://nz.sa/EQane
https://nz.sa/ybfAQ
https://nz.sa/OvXdA
https://nz.sa/rXWRU
https://nz.sa/bqSAC
https://nz.sa/BiPCf
https://nz.sa/oCjCb
https://nz.sa/JolFZ
https://nz.sa/ZPzUA
https://nz.sa/KoqUa
https://nz.sa/GDkne
https://nz.sa/synfS
https://nz.sa/MMCMD
https://nz.sa/NBXID
https://nz.sa/Vfyht
https://nz.sa/Nsdwf
https://nz.sa/yjeYK
https://nz.sa/RhLHC
https://nz.sa/YvNFI
https://nz.sa/hUvvn
https://nz.sa/nXtjv
https://nz.sa/hVAJJ
https://nz.sa/sqfTh
https://nz.sa/HLwWW
https://nz.sa/fFzBM
https://nz.sa/dHVQC
https://nz.sa/wabQR
https://nz.sa/vzkZW
https://nz.sa/RUshz
https://nz.sa/qhpmg
https://nz.sa/PDRtA
https://nz.sa/nVJwK
https://nz.sa/LUGzJ
https://nz.sa/DntRu
https://nz.sa/nvZdF
https://nz.sa/LSwUk
https://nz.sa/vacgI
https://nz.sa/rhvgf
https://nz.sa/FSPVy
https://nz.sa/HSZhY
https://nz.sa/NKBma
https://nz.sa/OsrZS
https://nz.sa/EHMgW
https://nz.sa/gJHUw
https://nz.sa/VfTIJ
https://nz.sa/ASsWq
https://nz.sa/HtoKg
https://nz.sa/UzVGe
https://nz.sa/uPReT
https://nz.sa/HyzQC
https://nz.sa/TaZiq
https://nz.sa/nmxMP
https://nz.sa/VJYhc
https://nz.sa/swbKu
https://nz.sa/Mbxke
https://nz.sa/nmRrc
https://nz.sa/zRGGq
https://nz.sa/eXizT
https://nz.sa/bNkZe
https://nz.sa/ZCyRN
https://nz.sa/hGBlm
https://nz.sa/AeXes
https://nz.sa/ppYWJ
https://nz.sa/iMXMW
https://nz.sa/rJEZG
https://nz.sa/QeeIq
https://nz.sa/XDdpc
https://nz.sa/CQhUN
https://nz.sa/EILYz
https://nz.sa/laGJv
https://nz.sa/gQTLZ
https://nz.sa/NWyUz
https://nz.sa/qtkLO
https://nz.sa/NGmde
https://nz.sa/mcMsi
https://nz.sa/HrMbP
https://nz.sa/FenTD
https://nz.sa/uBHGF
https://nz.sa/RkUCV
https://nz.sa/dNOHT
https://nz.sa/CFjgS
https://nz.sa/KMlLF
https://nz.sa/GuHPU
https://nz.sa/EkTWq
https://nz.sa/YSZsQ
https://nz.sa/KxNBP
https://nz.sa/KAHrU
https://nz.sa/ALDpF
https://nz.sa/VzHaF
https://nz.sa/XEisb
https://nz.sa/xcSkf
https://nz.sa/fdVhS
https://nz.sa/KUXHX
https://nz.sa/ENVCu
https://nz.sa/Zsuyh
https://nz.sa/wbbCz
https://nz.sa/YbEXe
https://nz.sa/PgFhI
https://nz.sa/ajcfs
https://nz.sa/TlUni
https://nz.sa/RAZEv
https://nz.sa/KMxsr
https://nz.sa/gNQyl
https://nz.sa/iKoPN
https://nz.sa/rvyDV
https://nz.sa/egwPI
https://nz.sa/Rtand
https://nz.sa/NvVTK
https://nz.sa/VqDDC
https://nz.sa/JPeLF
https://nz.sa/GKSdQ
https://nz.sa/fVMTP
https://nz.sa/ufPUt
https://nz.sa/YIKSq
https://nz.sa/Nxfum
https://nz.sa/WRLun
https://nz.sa/ydTGu
https://nz.sa/ZRXar
https://nz.sa/iaHJO
https://nz.sa/FuDNn
https://nz.sa/djVoM
https://nz.sa/mbKqo
https://nz.sa/YJXcj
https://nz.sa/hBwwl
https://nz.sa/Ujene
https://nz.sa/LuJCP
https://nz.sa/sBQvp
https://nz.sa/KGuwk
https://nz.sa/npyHY
https://nz.sa/cDKxN
https://nz.sa/DVOCD
https://nz.sa/UkLKM
https://nz.sa/hSCWY
https://nz.sa/bHCZV
https://nz.sa/CJfpY
https://nz.sa/pORWo
https://nz.sa/sWXnE
https://nz.sa/KoqUa
https://nz.sa/kyXiN
https://nz.sa/KffmV
https://nz.sa/WOZhU
https://nz.sa/rVHlu
https://nz.sa/bTBtb
https://nz.sa/EtBMH
https://nz.sa/wgBEX
https://nz.sa/EwgIT
https://nz.sa/ZPzUA
https://nz.sa/vjTTg
https://nz.sa/MNkrn
https://nz.sa/oWNNx
https://nz.sa/KMjUM
https://nz.sa/qcnMV
https://nz.sa/mSpJt
https://nz.sa/AnnbJ
https://nz.sa/OETsE
https://nz.sa/tovWd
https://nz.sa/KAbHX
https://nz.sa/cEGqL
https://nz.sa/hvMut
https://nz.sa/QWDqt
https://nz.sa/mJfyz
https://nz.sa/fkCkl
https://nz.sa/ZeEwY
https://nz.sa/ZeEwY
https://nz.sa/PFbJs
https://nz.sa/rIQNJ
https://nz.sa/ZswHN
https://nz.sa/qcBvj
https://nz.sa/HJpww
https://nz.sa/fHfxu
https://nz.sa/hZiNS
https://nz.sa/RzYbK
https://nz.sa/GKSdQ
https://nz.sa/hhirm
https://nz.sa/tDtcr
https://nz.sa/ksQHz
https://nz.sa/NcHgR
https://nz.sa/xbojQ
https://nz.sa/jNkft
https://nz.sa/SsXsw
https://nz.sa/WicIy
https://nz.sa/ybfAQ
https://nz.sa/rXWRU
https://nz.sa/oCjCb
https://nz.sa/JolFZ
https://nz.sa/ridPb
https://nz.sa/RzYbK
https://nz.sa/GKSdQ
https://nz.sa/tDtcr
https://nz.sa/ksQHz
https://nz.sa/WicIy
https://nz.sa/Xuqsv
https://nz.sa/OvXdA
https://nz.sa/ybfAQ
https://nz.sa/JYBHj
https://nz.sa/BiPCf
https://nz.sa/EQane
https://nz.sa/bqSAC
https://nz.sa/rXWRU
https://nz.sa/LNHAS
https://nz.sa/WCBWC
https://nz.sa/vAFxv
https://nz.sa/jRfRY
https://nz.sa/LqPVw
https://nz.sa/SGFYo
https://nz.sa/HuRKX
https://nz.sa/VuMVk
https://nz.sa/IIAQU
https://nz.sa/jQXcR
https://nz.sa/btRed
https://nz.sa/QLnYu
https://nz.sa/MCxha
https://nz.sa/nNgBh
https://nz.sa/sedHx
https://nz.sa/WxIyX
https://nz.sa/Ueufy
https://nz.sa/qTOhp
https://nz.sa/cZcHx
https://nz.sa/HbzzQ
https://nz.sa/EFakh
https://nz.sa/jTTGx
https://nz.sa/AModN
https://nz.sa/TVZkl
https://nz.sa/MQYuI
https://nz.sa/bZmJj
https://nz.sa/fJhDB
https://nz.sa/HHNEp
https://nz.sa/EqTAX
https://nz.sa/QMnvb
https://nz.sa/QkOST
https://nz.sa/kZkIt
https://nz.sa/lJZmT
https://nz.sa/RjFTP
https://nz.sa/UXDMi
https://nz.sa/wSNlE
https://nz.sa/AGbOQ
APIRAJA88 adalah situs slot online terpercaya dengan link Raja Slot Gacor Slot888 hari ini yang dikenal gampang menang maxwin terbaru di tahun 2025 ini. Mainkan sekarang dengan unduh apk slot 888 sekarang!
https://www.bombardierblood.com/
Leave a comment