 After several posts on rhinestones and jewels, you're probably wondering what I'm going to do with them.
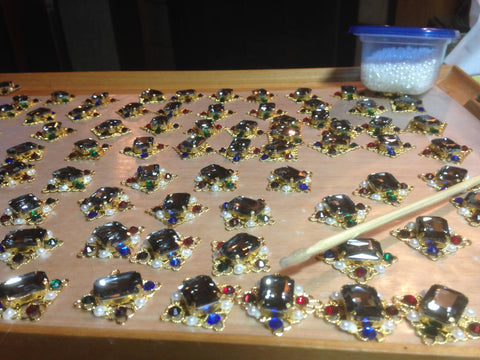
I'm making ouches. Ouches were small(ish) jewelry pieces, similar to decorative buttons or brooches. In the period, the most wealthy people wore jewelry everywhere they could find to put it, and much of this jewelry was in the form of ouches.
Ouches were made of precious metals and gems and were extremely expensive. They seem to have usually been used in matching sets, although often you'll see several different sets worn at once. Many of Queen Elizabeth's portraits show her wearing sets of red stones and of black stones at the same time.
There are some craftsmen making excellent reproduction ouches, but but given that I need over 200(!) of them, I need a less expensive alternative, so I'm turning to a technique I've been using for many years. I'm well aware that these are not historically accurate and would not be suitable for strict reenactment, but there are plenty of venues for wearing Elizabethan styles in which they are appropriate.
When I first started making Elizabethan court gowns, I wanted to find a way to create ouches, so I went looking through the few costuming books to which I had access. (yes, this was many years before the internet. I'm old.) In her book “Period Costume For Stage and Screen”, I read that when Jean Hunnisett, who made the costumes for the classic series Elizabeth R, needed ouches for Queen Elizabeth's Ditchley Dress, she used “...jewels made up of six pearls and a colored stone glued onto a gold plastic mount”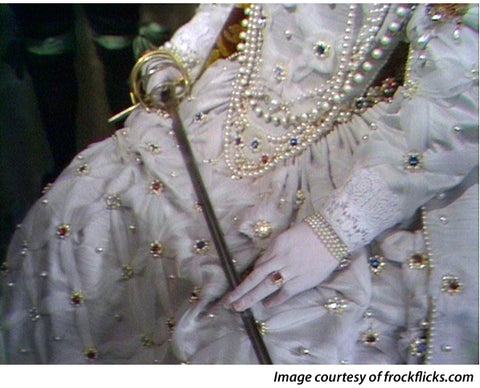
While these are quite pretty, I wasn't thrilled with the idea of plastic mounts, and I couldn't find them anyway, so I started experimenting with using filigree jewelry findings as the base for my ouches. These are stamped from thin metal, usually brass, and are available in a number of finishes.
I make the ouches by gluing on rhinestones, glass jewels, and pearls. Some people disdain using glue for any reason, but I don't have metalworking skills or the time to acquire them. If the proper glues and appropriate stones are used, these ouches can be quite sturdy and will last for years.
Supplies for Making Ouches
For filigrees, I don't recommend the raw brass ones because the metal can oxidize and discolor, staining your fabric. The gold or silver plated ones are only a few cents more.
Your stones can be faceted, or cabochons (domed). I strongly recommend glass or crystal stones, not the plastic ones which look like what they are. It's difficult to find stones in the flat table or pyramid cuts that were used in the 16th century, so I compromise by using modern faceted rhinestones. For my large stones, I used rectangular/octangular glass gems, which have a large flat area on top.
Round pearls can be a problem because it's hard to glue them on well. Even if you wire or sew them in place, they tend to catch on things and are much more likely to break or pop off. Flat back pearls are easier to work with and are much more secure. I bought the ones I'm using here in a box of mixed sizes at Michaels.
The right glue is vital. If you're gluing metal to metal, as I did for the large jewels in metal settings, the usual recommendation is for cyanoacrylate "super glue", 2 part epoxy, or E6000. My preference is for E6000 because you can move it around a bit for a while. It is toxic, so use it in a ventilated space.
I don't use E6000 for the smaller gems because it's hard to control. It tends to come out in big gobs and picking up smaller amounts with a toothpick doesn't work well. For gluing the smaller gems and the flat back pearls I used Gem-Tac, which is similar to white glue and is intended for gluing gems to a variety of materials. Metal is not one of the materials listed on the bottle, but it works fine for me.
Because the filigree has holes in it, glue will leak through to the work surface. To keep my surface clean and keep the piece from gluing itself in place, I always work on a sheet of waxed paper. It can easily be peeled off the piece even after the glue has dried.
Apply the glue to the filigree, and let it dry for a minute before placing your gems. It will make it much easier to place them.
Something that makes gluing small objects much easier is a bead picker-upper. This is simply a stick with a bit of sticky wax on the end. I use dental wax and bamboo skewers to make mine. Just grab a pea sized lump of wax, roll it into a ball, and stick it on the end of the skewer, shaping it into a blunt point. 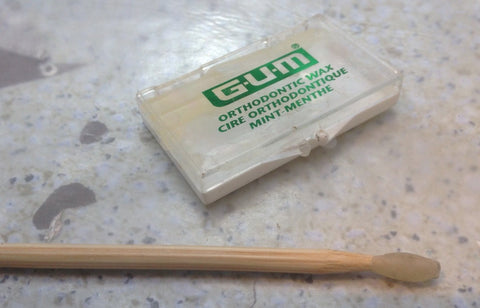
Simply touch the jewel with just enough force to make it stick, and place the jewel on the glued surface.
In Part 2, I'll talk about designing your ouches and how to attach them to your garments.
Cozy, all those shapes can work. I tend to keep the size under 1 1/2", unless I’m going for a really over the top effect like a comic character.
This is too cool. I need to make new garb and this’ll make or easier.
I have filigree findings. Can different shapes be used. Have square, rectangular, round and diamond shapes. Does size matter as well. I made my Elizabeth belt with this technique a couple years ago. I’m not sure it’s right though.
Beautiful! I’m looking forward to seeing the finished gown!
If you can’t find plated brass filigreed and have to use raw brass stampings, you can use a polycrylic spray to seal them-then they won’t oxidize or discolor!
Hunnisett’s book on quick costumes (paper, foil, etc) for kids advises cut-up fruit gums for jewels — she was very inventive!
Leave a comment